 Mattermost v11.0 is now available! Learn what's new »


Deploy Mattermost on Kubernetes
 Available on Entry, Enterprise, and Enterprise Advanced plans (not available on Professional)
Mattermost server can be deployed on various Kubernetes platforms, providing a scalable and robust infrastructure for your team communication needs. This guide covers deployment options for major cloud providers and general Kubernetes installations.
Tip
To learn how to safely upgrade your deployment in Kubernetes for High Availability with Active/Active support, see the Upgrading Mattermost in Kubernetes and High Availability Environments documenation.
Platform
Choose your preferred platform below for specific deployment instructions:
You can use the Mattermost Kubernetes Operator to deploy Mattermost on Kubernetes using S3-compatible storage and a managed database service. While the operator supports a range of configurations, we strongly recommend using a cloud-native approach for production environments.
Prerequisites
Before you begin, ensure you have the following:
A functioning Kubernetes cluster (see the Kubernetes setup guide). Your cluster should be running a supported Kubernetes version.
The kubectl command-line tool installed on your local machine (see the kubectl installation guide).
A fundamental understanding of Kubernetes concepts, such as deployments, pods, and applying manifests.
Sufficient Kubernetes resources allocated based on your expected user load. Consult the scaling for Enterprise documentation for resource requirements at different scales.
Installation steps
The installation process involves setting up necessary operators and then deploying Mattermost itself.
Step 1: Install the NGINX Ingress Controller
Follow the instructions in the Kubernetes deployment documentation to install the NGINX ingress controller on your Kubernetes cluster. Mattermost recommends installing the Nginx Operator via helm, regardless of platform you are installing to.
Step 2: Install the Mattermost Operator
The Mattermost Kubernetes Operator can be installed using Helm.
Install Helm (version 3.13.0 or later). See the Helm quickstart documentation for installation instructions.
Add the Mattermost Helm repository:
helm repo add mattermost https://helm.mattermost.com
Create a file named
config.yamland populate it with the contents of the Mattermost operator values file. This file allows for customization of the operator.Create a namespace for the Mattermost Operator:
kubectl create ns mattermost-operator
Install the Mattermost Operator. If you don’t specify a version, the latest version of the Mattermost Operator will be installed. We recommend using the latest version of the Mattermost Operator.
helm install <your-release-name> mattermost/mattermost-operator -n <namespace_name>For example:
helm install mattermost-operator mattermost/mattermost-operator -n mattermost-operatorTo use your custom
config.yamlfile:helm install mattermost-operator mattermost/mattermost-operator -n mattermost-operator -f config.yaml
Step 3: Deploy Mattermost
Note
A Mattermost Enterprise license is required for multi-server deployments.
For single-server deployments without an Enterprise license, add
Replicas: 1to thespecsection in step 2 below. See the high availability documentation for more on highly-available deployments.
(Mattermost Enterprise only) Create a Mattermost license secret. Create a file named
mattermost-license-secret.yamlwith the following content, replacing[LICENSE_FILE_CONTENTS]with your actual license:
apiVersion: v1
kind: Secret
metadata:
  name: my-mattermost-license
type: Opaque
stringData:
  license: <LICENSE_FILE_CONTENTS>
Create a Mattermost installation manifest file named
mattermost-installation.yaml. File names in this guide are suggestions; you can use different names. Use the following template, adjusting the values as needed:
apiVersion: installation.mattermost.com/v1beta1
kind: Mattermost
metadata:
  name: <INSTALLATION_NAME_HERE>        # Example: mm-example-full
spec:
  size: <SIZE_VALUE_HERE>               # Example: 5000users
  ingress:
    enabled: true
    host: <FULL_DOMAIN_NAME_HERE>       # Example: example.mattermost-example.com
    annotations:
      kubernetes.io/ingress.class: nginx
version: <VERSION_HERE>               # Example: 9.3.0
licenseSecret: ""                     # If you created a license secret, put the name here
Key fields in the manifest include:
metadata.name: The name of your Mattermost deployment in Kubernetes.
spec.size: The size of your installation (e.g., “100users”, “1000users”, etc.).
spec.ingress.host: The DNS name for your Mattermost installation.
spec.version: The Mattermost version. See the server version archive for available versions. You should use a supported version of Mattermost in conjunction with the latest version of the Mattermost Operator.
spec.licenseSecret: The name of the Kubernetes secret containing your license (required for Enterprise).For a full list of configurable fields, see the example manifest and the Custom Resource Definition.
Create a file named
mattermost-database-secret.yamlfor database credentials. This secret must be in the same namespace as the Mattermost installation.
apiVersion: v1
data:
  DB_CONNECTION_CHECK_URL: <DB_CONNECTION_CHECK_URL>
  DB_CONNECTION_STRING: <DB_CONNECTION_STRING>
  MM_SQLSETTINGS_DATASOURCEREPLICAS: <MM_SQLSETTINGS_DATASOURCEREPLICAS>
kind: Secret
metadata:
  name: my-postgres-connection
type: Opaque
Example for AWS Aurora with PostgreSQL:
apiVersion: v1
data:
  DB_CONNECTION_CHECK_URL: cG9zdGdyZXM6Ly91c2VyOnN1cGVyX3NlY3JldF9wYXNzd29yZEBteS1kYXRhYmFzZS5jbHVzdGVyLWFiY2QudXMtZWFzdC0xLnJkcy5hbWF6b25hd3MuY29tOjU0MzIvbWF0dGVybW9zdD9jb25uZWN0X3RpbWVvdXQ9MTA=
  DB_CONNECTION_STRING: cG9zdGdyZXM6Ly91c2VyOnN1cGVyX3NlY3JldF9wYXNzd29yZEBteS1kYXRhYmFzZS5jbHVzdGVyLWFiY2QudXMtZWFzdC0xLnJkcy5hbWF6b25hd3MuY29tOjU0MzIvbWF0dGVybW9zdD9jb25uZWN0X3RpbWVvdXQ9MTA=
  MM_SQLSETTINGS_DATASOURCEREPLICAS: cG9zdGdyZXM6Ly91c2VyOnN1cGVyX3NlY3JldF9wYXNzd29yZEBteS1kYXRhYmFzZS5jbHVzdGVyLXJvLWFiY2QudXMtZWFzdC0xLnJkcy5hbWF6b25hd3MuY29tOjU0MzIvbWF0dGVybW9zdD9jb25uZWN0X3RpbWVvdXQ9MTA=
kind: Secret
metadata:
  name: my-postgres-connection
type: Opaque
Note
The
DB_CONNECTION_CHECK_URLvalue is consumed by the operator’s legacypostgres:13+pg_isreadyreadiness init container (the defaultexternalmode ofspec.database.readinessCheck). New deployments are encouraged to setspec.database.readinessCheck.mode: builtin(see Step 5 below), in which case the readiness init container runs the in-imagemattermost db pingcommand and theDB_CONNECTION_CHECK_URLfield is no longer required. The legacyexternalmode remains the default for backward compatibility but is slated for deprecation in a future operator release.
Step 4: Create the Filestore Secret
Create a file named mattermost-filestore-secret.yaml to store the credentials for your object storage service (e.g., AWS S3 or any S3-compatible service). This secret must be created in the same namespace where you intend to install Mattermost. The file should contain the following YAML structure:
apiVersion: v1
kind: Secret
metadata:
  name: <secret-name>  # Choose a descriptive name (e.g., my-s3-credentials)
type: Opaque
data:
  accesskey: <base64-encoded-access-key>
  secretkey: <base64-encoded-secret-key>
Key |
Description |
Required |
|---|---|---|
accesskey |
Base64-encoded access key for your storage service. |
Yes |
secretkey |
Base64-encoded secret key for your storage service. |
Yes |
metadata.name |
The name of the Kubernetes secret. |
Yes |
Important
The accesskey and secretkey values must be base64-encoded. Do not enter the raw keys directly. Use a command-line tool or online encoder to generate the base64 strings.
Example (AWS S3):
apiVersion: v1
kind: Secret
metadata:
  name: my-s3-credentials
type: Opaque
data:
  accesskey: QUNDRVNTX0tFWQo=  # Example: Replace with your actual encoded key
  secretkey: U1VQRVJfU0VDUkVUX0tFWQo=  # Example: Replace with your actual encoded key
Step 5: Configure the Mattermost Installation Manifest
Modify the
mattermost-installation.yamlfile (created in step 2) to connect Mattermost to your external database and object storage. Refer to the supported fields for guidance on where to add these configurations within the YAML structure.Connect to the database:
Add the following to the
specsection of your manifest:spec: database: external: secret: <database-secret-name> # The name of the database secret (e.g., my-postgres-connection)
(Recommended) Configure the database-readiness init container to use the in-image
mattermost db pingcommand instead of the legacypostgres:13+pg_isreadyflow. This avoids the need to pull a separatepostgres:13image (the primary motivation for air-gapped clusters that can’t mirror it) and keeps your readiness check in sync with the Mattermost release you’re running.spec: database: external: secret: <database-secret-name> readinessCheck: mode: builtin timeout: 5m # optional; default is 5mUsing
builtinmode requires a Mattermost release that ships themattermost db pingcommand (see the Mattermost server pull request for availability).Omitting
readinessCheck(or settingmode: external) preserves the legacypostgres:13+pg_isreadybehavior. The legacy mode is the current default for backward compatibility and will be deprecated in a future operator release. See the Mattermost CRD reference for the fullreadinessCheckfield schema.
Connect to Object Storage:
Add the following to the
specsection of your manifest:spec: fileStore: external: url: <storage-service-url> # The URL of your storage service (e.g., s3.amazonaws.com) bucket: <bucket-name> # The name of your storage bucket secret: <filestore-secret-name> # The name of the filestore secret (e.g., my-s3-credentials)
If you are using Amazon S3, it’s recommended to enable server-side encryption (SSE) and SSL. Add the following environment variables to the
mattermostEnvsection:
spec:
  mattermostEnv:
    MM_FILESETTINGS_AMAZONS3SSL: true
    MM_FILESETTINGS_AMAZONS3SSE: true
Review Mattermost Resource Status
After a Mattermost installation has been created with the Operator, you can review its status with the following:
kubectl -n [namespace] get mattermost
The kubectl describe command can be used to obtain more information about the Mattermost server pods:
kubectl -n [namespace] describe pod
Follow logs
The following command can be used to follow logs on any kubernetes pod:
kubectl -n [namespace] logs -f [pod name]
If the -n [namespace] is omitted, then the default namespace of the current context is used. We recommend specifying the namespace based on your deployment.
This command can be used to review the Mattermost Operator or Mattermost server logs as needed.
Note
If you’re new to Kubernetes or prefer a managed solution, consider using a service like Amazon EKS, Azure Kubernetes Service, Google Kubernetes Engine, or DigitalOcean Kubernetes. While this guidance focuses on using external, managed services for your database and file storage, the Mattermost Operator does offer the flexibility to use other solutions. For example, you could choose to deploy a PostgreSQL database within your Kubernetes cluster using the CloudNative PG operator (or externally however you wish), or use any self-hosted S3-compatible storage service.
While using managed cloud services is generally simpler to maintain and our recommended approach for production deployments, using self-managed S3-compatible storage services and CloudNative PG for PostgreSQL are also valid options if you have the expertise to manage them.
If you choose to use self-managed components, you’ll need to adapt the instructions accordingly, pointing to your internal services instead.
To customize your production deployment, refer to the configuration settings documentation.
If you encounter issues during deployment, consult the deployment troubleshooting guide.
Frequently Asked Questions
What is the Operator’s version compatibility with Mattermost Server?
While generally speaking, the Operator should be compatible with most, or all versions of Mattermost Server, we recommend always using the latest version of the Operator in conjunction with a supported version of Mattermost Server.
You can use a supported Azure Marketplace Container Offer to install Mattermost on your existing Azure infrastructure.
Before you begin
Before deploying, make sure you have the following:
An AKS cluster: with the Application Gateway Ingress Controller (AGIC) add-on enabled or another Ingress controller deployed.
PostgreSQL v13.0+ database: Azure Database for PostgreSQL - Flexible Server with Private Access is recommended. Deploy one by following this Microsoft quick start guide.
Private Network Connectivity: Verify that there is network connectivity between your AKS cluster and the PostgreSQL database.
Valid DNS name and TLS certificate: You must have access to a DNS zone and provide a valid TLS key and certificate for the Ingress Controller.
Node Capacity: At least 2 AKS nodes for high availability when deploying for 100 users or more.
License Key: Trial or Enterprise license to test high availability and other Enterprise features.
Installation steps
The installation process includes deploying Mattermost and updating the server.
Step 1: Deploy Mattermost
Deploy Mattermost from the Azure Marketplace Container Offer and select Get it now.
Alternatively, you can go to the
Extensions + Applicationssection of your AKS cluster and install the Mattermost offering from there. Visit the Microsoft cluster extensions documentation to learn more.
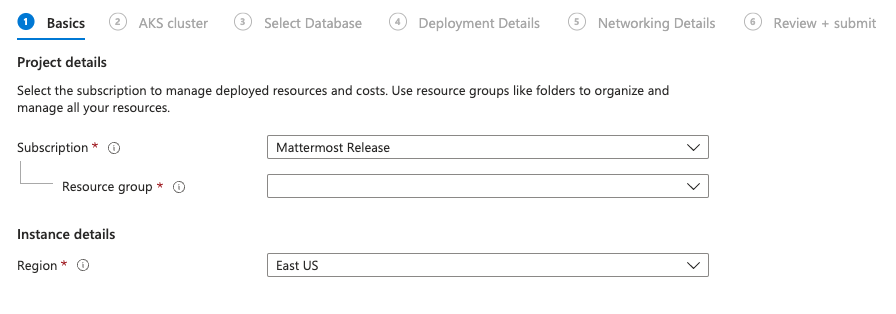
Choose the Resource Group and the Region of your installed AKS and PostgreSQL database.
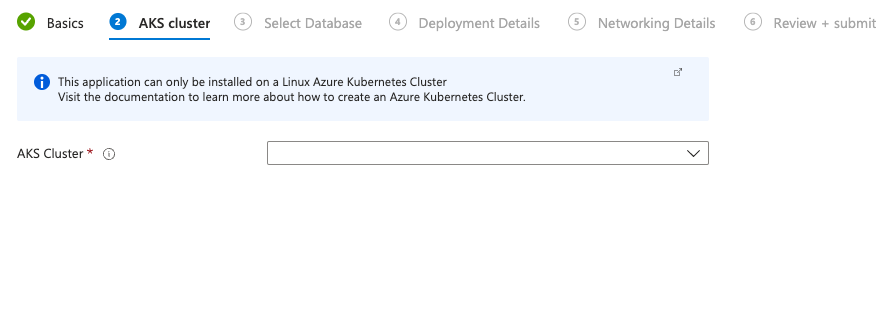
Choose your AKS cluster.
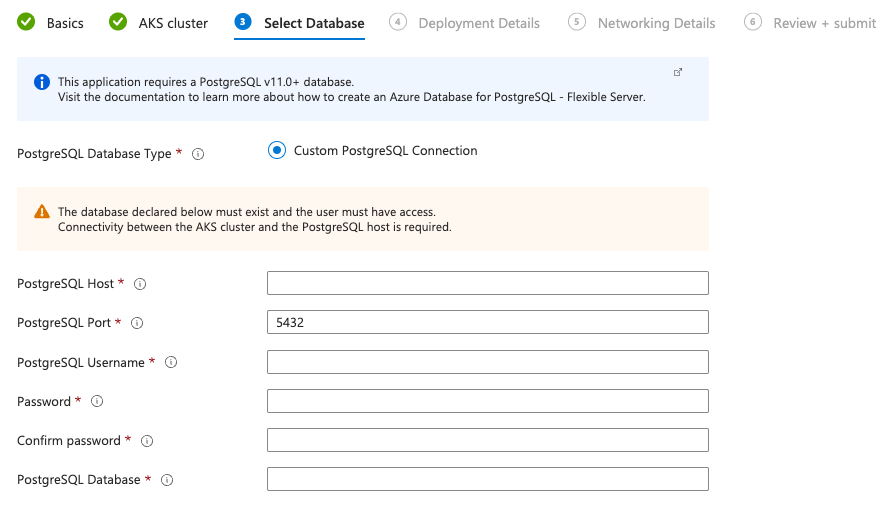
Fill in the details for your PostgreSQL database. Ensure the user specified has full access.
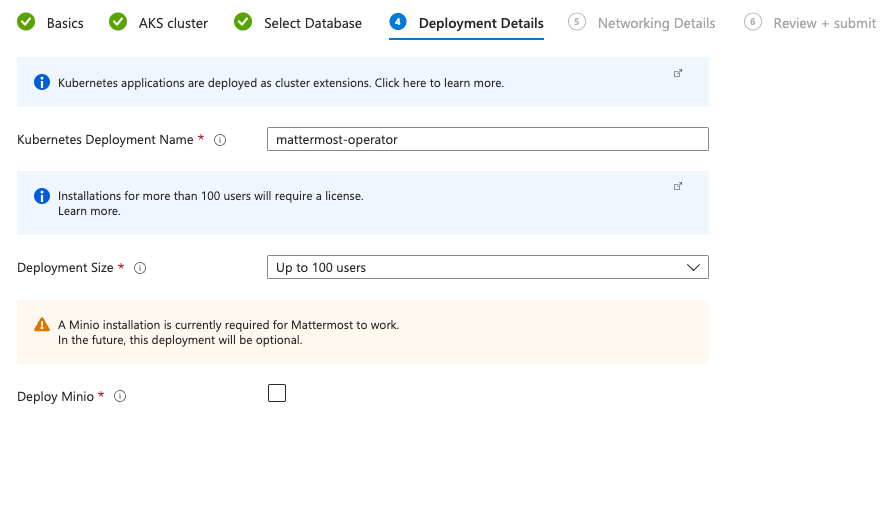
Specify Deployment Details including Deployment Name and Deployment Size. You will need to configure file storage for your Mattermost instance. We recommend using an S3-compatible storage service or an NFS-compatible server.
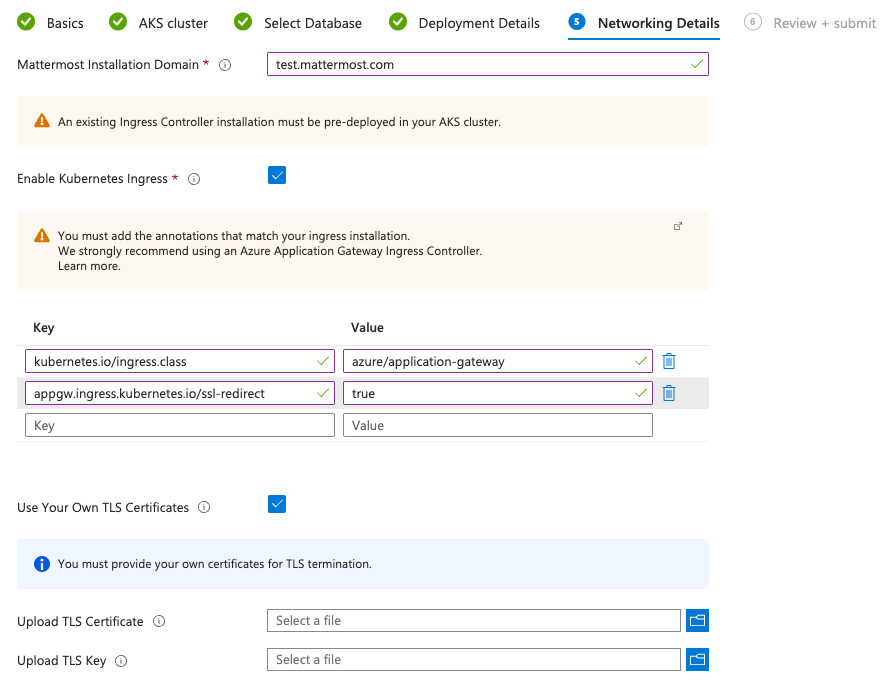
Configure Mattermost installation hostname and Ingress details. The AGIC add-on is used in the following example to show the ingress annotations required.
You can use any pre-installed Ingress Controller in your cluster as long as it supports Kubernetes Ingress and TLS termination.
kubernetes.io/ingress.class: azure/application-gateway
appgw.ingress.kubernetes.io/ssl-redirect: "true"
Additionally, we recommend considering:
Enforcing a minimum TLS version (e.g., TLS 1.2).
Deploying a Web Application Firewall (WAF) for additional protection, if supported by your ingress controller.
Limiting access using Kubernetes Network Policies.
Ensure that everything is running. You should be able to check the installed plugin from the AKS Extensions + Applications page under the Settings menu.
When the deployment is complete, obtain the hostname or IP address of your Mattermost deployment using the following command:
kubectl -n mattermost-operator get ingress
Use your IP address from the
ADDRESScolumn, and create a DNS record in your domain registration service.Access your working Mattermost installation at the URL you’ve determined in your DNS record.
Learn more about administrating your Mattermost server by visiting the Administration Guide.
Step 2: Upgrade Mattermost via your AKS cluster
Visit the
Extensions + Applicationssection of your AKS cluster where your Mattermost installation is deployed.You can enable minor version auto upgrades since these are not updating Mattermost version
Expand the
Configuration Settingstable and add the below configuration and the version you want to install as a value.
 global.azure.mattermost.version

.. image:: /_static/images/global-azure-mattermost-version.png
 :alt: An example of using custom Mattermost version.
Select Save and wait for the upgrade.
Looking for a sovereign deployment on Azure Local?
For organizations requiring on-premises deployments with data sovereignty, Azure Local (formerly Azure Stack HCI) provides a hybrid cloud platform that enables you to run Mattermost on-premises while maintaining integration with Microsoft Teams and M365.
We recommend engaging Mattermost Professional Services for Azure Local deployments to ensure optimal configuration and compliance with your security requirements. Talk to an Expert to discuss your Azure Local deployment needs.
Important
You are responsible for Azure costs associated with any infrastructure you spin up to host a Mattermost server, and Azure credits cannot be applied towards the purchase of a Mattermost license.
You can use the supported Oracle Cloud Marketplace listing, Mattermost - OCI-Native (Kubernetes-based), to deploy a high-availability Mattermost environment on Oracle Cloud Infrastructure (OCI). One guided stack provisions a new Oracle Kubernetes Engine (OKE) cluster, a managed OCI Database with PostgreSQL system, an Object Storage bucket for file attachments, the Mattermost Kubernetes Operator, and HTTPS ingress through the OCI Native Ingress Controller.
Before you begin
Before deploying, make sure you have the following:
An Oracle Cloud tenancy and compartment you have permission to create resources in (VCN, OKE, IAM policies, OCI Database with PostgreSQL, Object Storage, Resource Manager)
Sufficient service limits for a new OKE cluster and its default worker pool (3 nodes,
VM.Standard.E5.Flexat 2 OCPUs/16GB each) and for an OCI Database with PostgreSQL systemA registered domain name you can create a DNS
Arecord for, pointing to the Mattermost load balancerA TLS certificate for that domain, imported into OCI Certificate Service, with its OCID ready before you deploy. The stack does not accept a raw PEM/private key, only a certificate OCID.
A Mattermost Enterprise license if you plan to deploy for more than 100 users. Larger sizes run Mattermost and PostgreSQL in high-availability mode, which requires a license.
Installation steps
The installation process includes deploying Mattermost and configuring the necessary components.
Step 1: Start from Oracle Cloud Marketplace
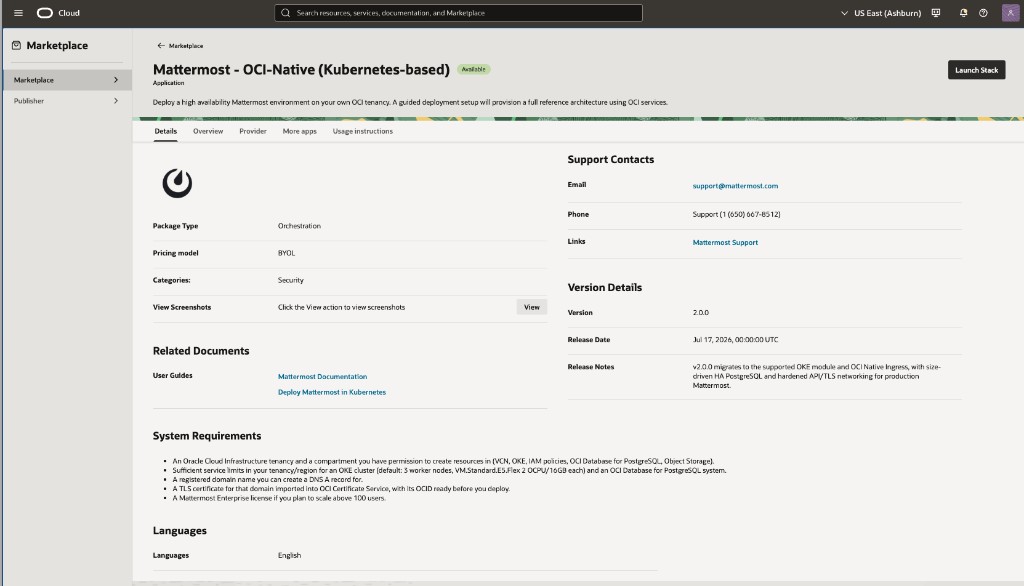
Go to the Mattermost - OCI-Native (Kubernetes-based) listing and select Launch Stack.
Step 2: Stack Information
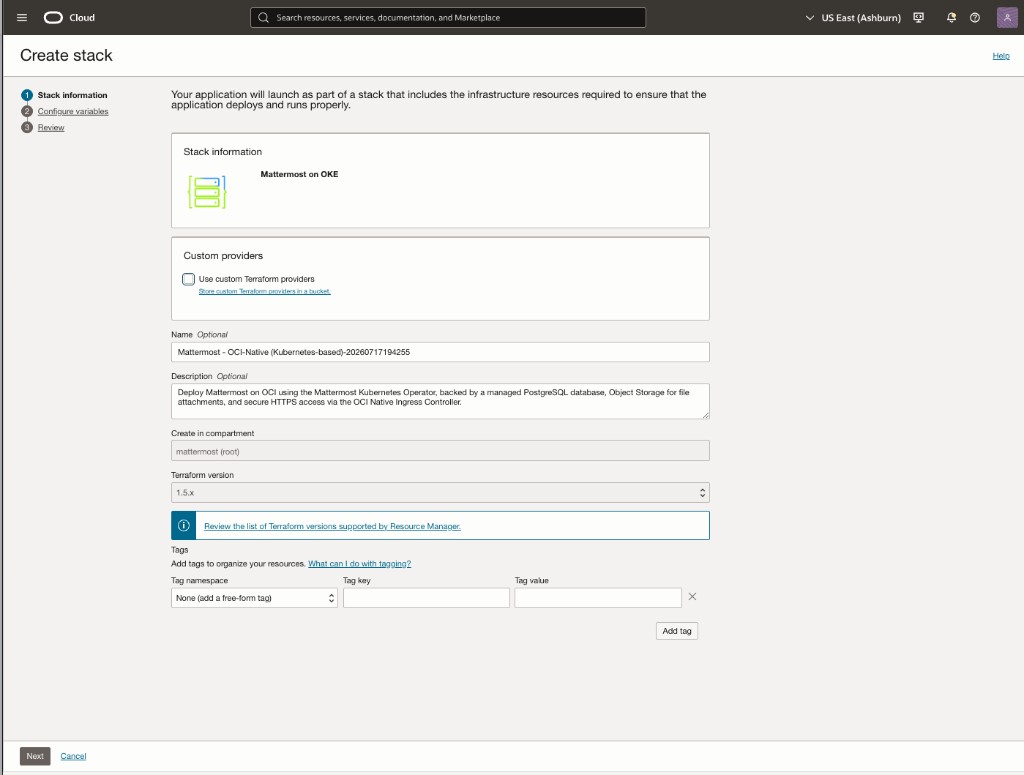
On the Create stack page, review the information, and then set the stack name, description, compartment, and Terraform version.
Step 3: Configure Variables
Set all the details for your Mattermost deployment. Variables are grouped by area; advanced groups are hidden behind a Show advanced options toggle so the default flow stays simple.
General Configuration
Compartment:
Target compartment for every resource the stack creates: the OKE cluster, VCN, PostgreSQL DB system, and Object Storage bucket.
Cluster Name Prefix:
Used as a prefix on all OCI resources created by the stack (default:
mattermost).
Show Recovery Options:
Leave off for a normal deployment. Only enable this if a previous apply failed and left resources blocking re-apply; it reveals a Deploy ID Revision field that forces new resource names.
Mattermost Installation
Mattermost Installation Name:
Name for this installation (default:
mattermost-prod).
Mattermost Installation Size:
Choose the size that matches your expected active user count:
100users,1000users,5000users,10000users, or25000users(default:100users). This drives both the Mattermost pod resources and the PostgreSQL topology (instance count, shape). It’s a create-time-only setting: changing it later requires deploying a new stack, because OCI can’t modify PostgreSQL topology in place. Sizes above 100 users deploy Mattermost and PostgreSQL in high-availability mode and require an Enterprise license.
Mattermost Version:
The Mattermost server version to install.
Mattermost License Key:
Upload your Enterprise license file. Optional at
100users; leave empty to start unlicensed and add a license later from System Console > Edition and License. Required for every larger size.
Mattermost FQDN:
The hostname end users will browse to (e.g.
mattermost.domain.com). You’ll point its DNSArecord at the stack’s output load balancer IP after deployment.
OCI Certificate Service OCID:
The OCID of the certificate you imported into OCI Certificate Service for that FQDN.
Mattermost LB Allowed CIDR Blocks:
IP ranges allowed to reach Mattermost over HTTPS. Default (
0.0.0.0/0) allows access from anywhere; restrict this for corporate or internal-only deployments.
Show Advanced Mattermost Options:
Turn this on to reveal the following fields, all of which have sensible defaults for most deployments:
Kubernetes Namespace: The namespace Mattermost is installed into (default:
mattermost).Helm Repository URL: Source of the Mattermost Operator Helm chart (default:
https://helm.mattermost.com).Operator Helm Chart Version: Choose the Mattermost Operator Helm chart version to install from the list (default: the newest version offered).
NIC Readiness Wait Timeout: How long to wait for the Native Ingress Controller to become ready before failing the apply (default: 180 seconds).
OKE Configuration
Kubernetes Version:
Leave empty to auto-select the newest version OKE publishes.
Worker OS Version:
Oracle Linux
8or9(default:8).
Worker Count:
Number of worker nodes in the cluster (default: 3, recommended for high availability). You can adjust this later by editing and re-applying the stack.
Show Advanced OKE Options:
Turn this on to reveal the following fields, all of which have sensible defaults for most deployments:
Virtual Cloud Network (VCN) CIDR: IP address range for the cluster’s network (default:
10.20.0.0/16). Only change this if it conflicts with an existing network you need to peer with.API Endpoint Allowed CIDR Blocks: IP ranges allowed to reach the Kubernetes API (default:
0.0.0.0/0, i.e. anywhere). Restrict this to your corporate gateway or VPN range for tighter security. Make sure the range you choose covers your own admin access, since there’s no bastion host as a fallback path.Cluster CNI: The pod networking mode:
OCI_VCN_IP_NATIVE(default, recommended for better performance and tighter VCN integration) orFLANNEL_OVERLAY.Worker Shape: Compute shape for each worker node (default:
VM.Standard.E5.Flexwith 2 OCPUs / 16 GB memory), suitable for most Mattermost deployments.Worker Pool Name: The name for the worker node pool as it appears in the OCI Console and CLI.
Cluster Tools
Install Metrics Server:
Enables
kubectl topand the metrics API HPA relies on, if you add your own autoscaler later. On by default; recommended for all deployments.
Create OKE IAM Policies:
Automatically creates the IAM policies OKE needs to manage cluster resources. On by default; disable only if these policies already exist in your compartment.
PostgreSQL
PostgreSQL Database Name / Description:
The display name and description for the OCI Database with PostgreSQL system (separate from the Mattermost application database name below).
PostgreSQL Major Version:
14,15,16, or17(default:16).
PostgreSQL Admin Username / Password:
Admin credentials for the DB system. Passwords must be 8–32 characters with at least one uppercase letter, one lowercase letter, one number, and one special character, and cannot contain single quotes, double quotes, backslashes, or semicolons.
Mattermost Database Name / User / Password:
The database, user, and password Mattermost itself connects with inside PostgreSQL (defaults:
mattermost/mmuser). The password follows the same rules as the PostgreSQL Admin Password above (8–32 characters, upper/lowercase, number, special character; no quotes, backslashes, or semicolons).
Create a Subnet for the Mattermost Database:
On by default, to create a dedicated subnet for the DB system. Disable to select an existing subnet instead.
PostgreSQL Backup Retention (Days):
Automatic-backup retention, 7–35 days (default: 30).
Show Advanced PostgreSQL Options:
Turn this on to reveal the following fields, all of which have sensible defaults for most deployments:
PostgreSQL Port: The port PostgreSQL listens on (default:
5432).Backup Window: Daily UTC time window for automatic backups.
Maintenance Window: Weekly UTC time window for maintenance operations.
Per-Tier Overrides: Instance count, OCPUs, and memory overrides for each Mattermost Installation Size tier.
Object Storage
Bucket Compartment:
Compartment for the Object Storage bucket. Defaults to the main compartment.
Object Storage Bucket Name:
Name of the bucket used to store Mattermost file attachments.
Tagging
Tag Resources:
Optionally apply OCI free-form or defined tags to every resource the stack creates.
Step 4: Review and Apply
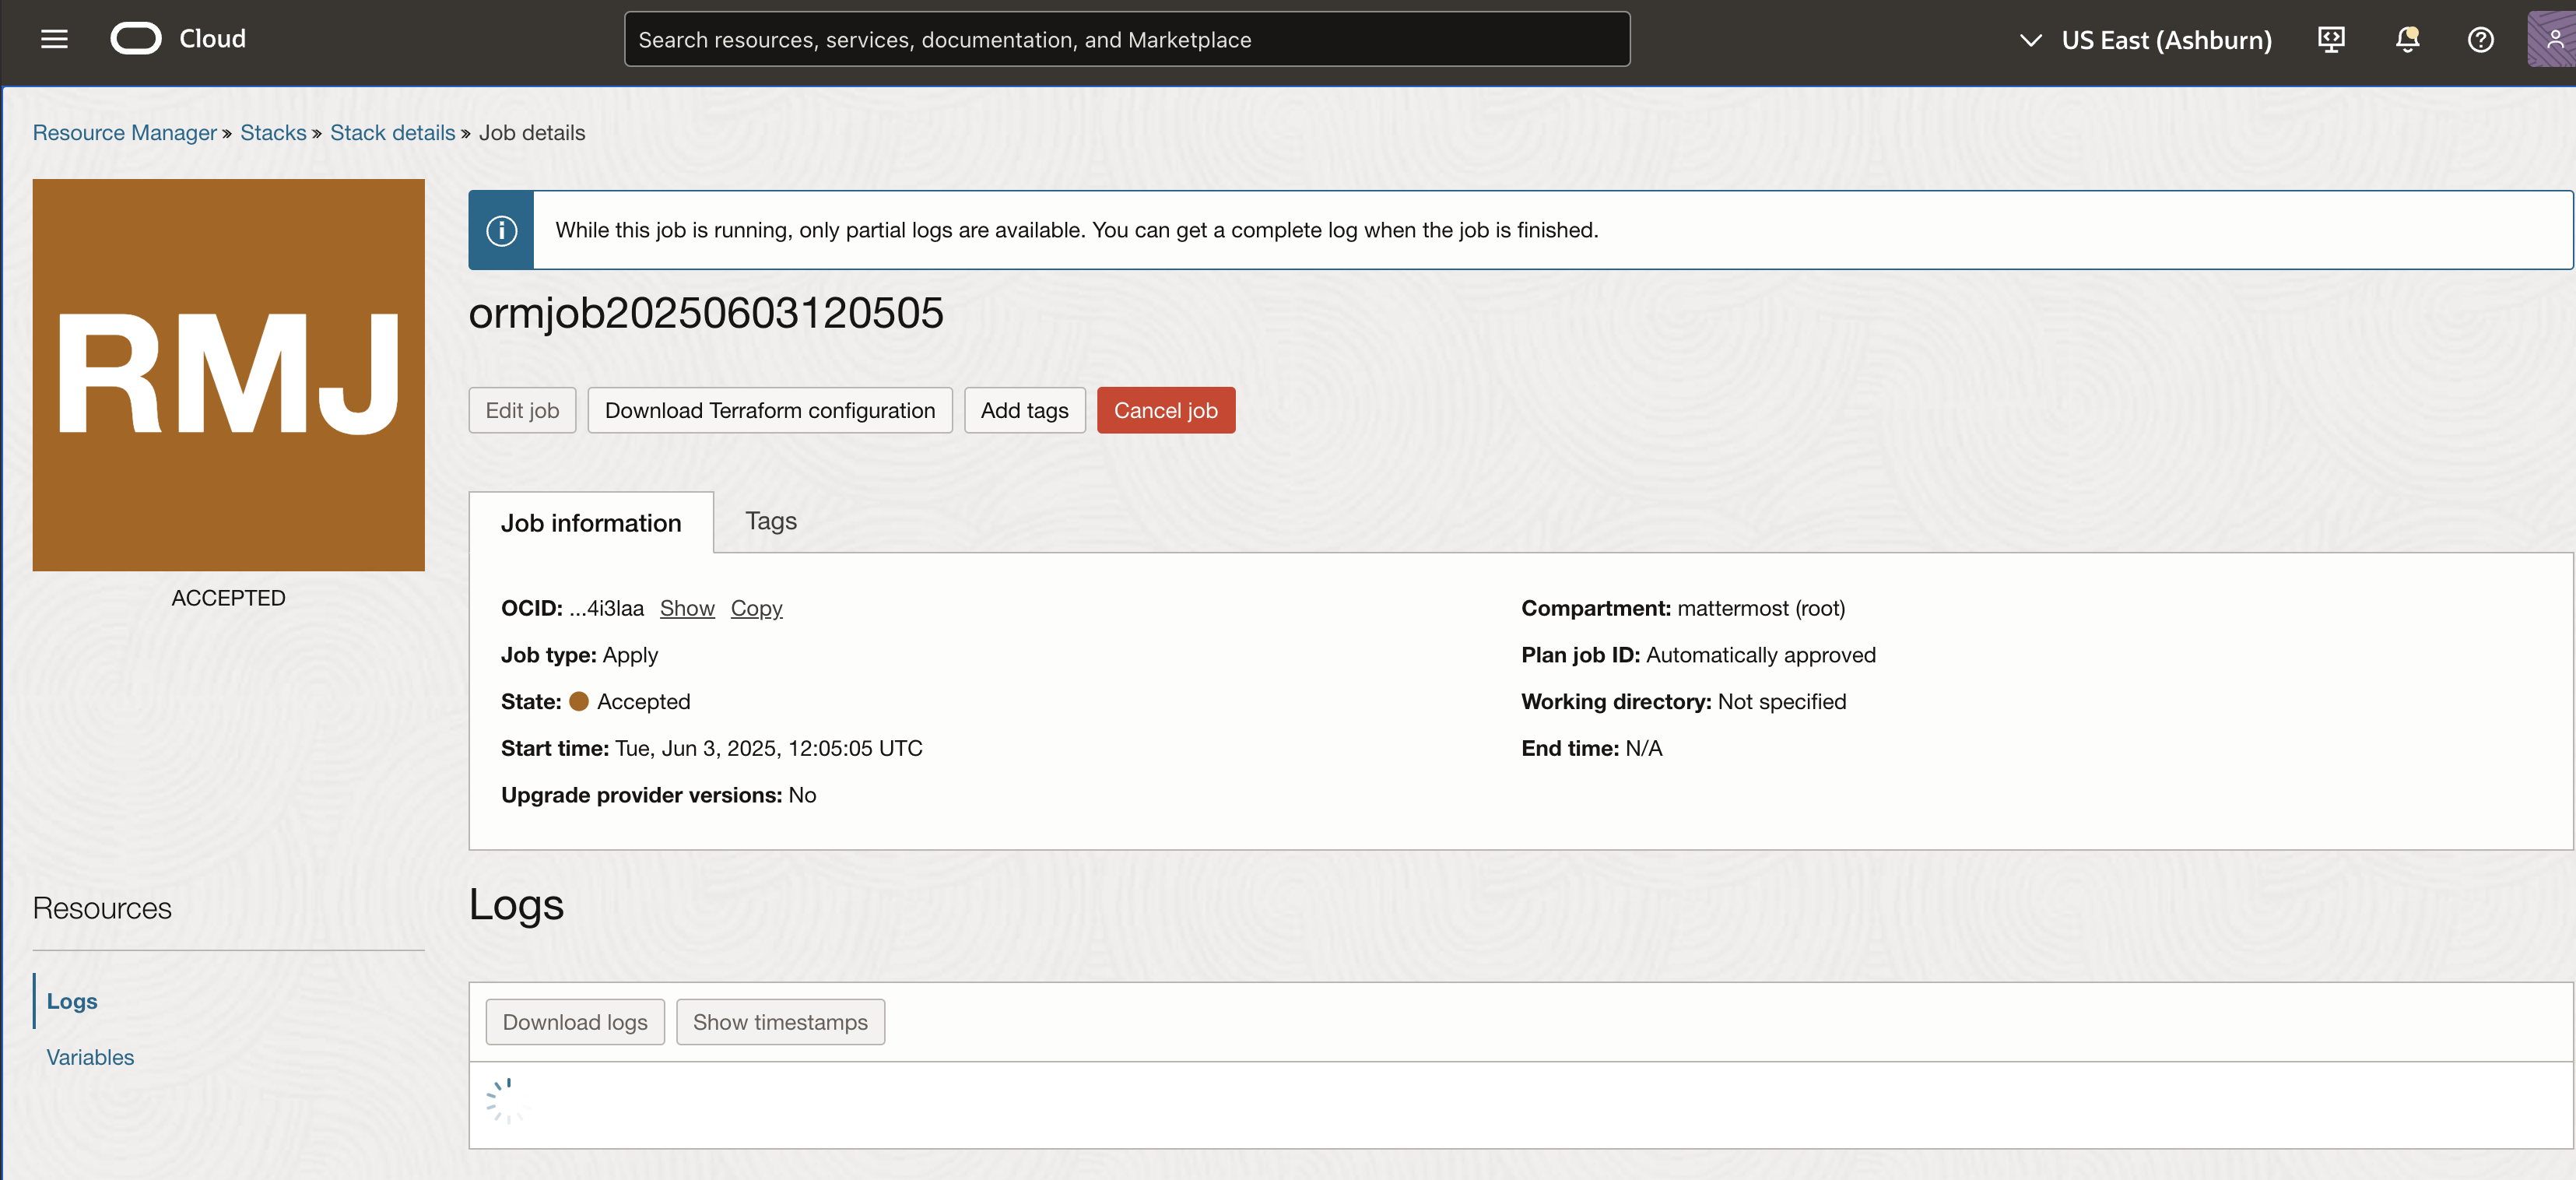
Check all your settings and select Create to start the deployment. Monitor the Resource Manager job and logs. The first apply takes about 30 minutes.
Step 5: After Deployment
When the job finishes, open the stack’s Application information tab to review the deployment details:
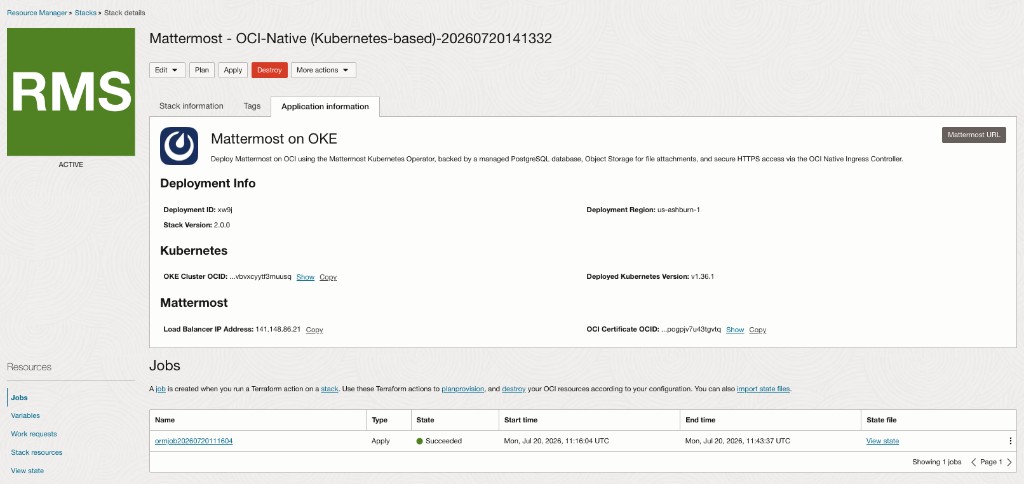
Load Balancer IP Address: the reserved OCI Public IP for the Mattermost load balancer. Create a DNS
Arecord from your Mattermost FQDN to this IP; it stays stable across re-applies.Mattermost URL (top-right button): the public HTTPS URL, reachable once DNS propagates.
OKE Cluster OCID and Deployed Kubernetes Version: identify the OKE cluster if you need to connect with
kubectlor the OCI CLI.
Once the A record resolves, open your browser and go to the Mattermost URL.
Step 6: Upgrade Mattermost
To upgrade your Mattermost installation:
Go to your Resource Manager stack and select Edit.
Update the Mattermost Version variable to the target release.
Save and run Plan, then Apply.
The Native Ingress Controller uses Pod Readiness Gates to hold new pods out of rotation until their OCI load balancer backend reports healthy. On an HA-sized installation (above 100users, multiple Mattermost replicas), this minimizes disruption during the rollout since other replicas keep serving traffic. On the default 100users size, which runs a single replica, a brief interruption while that pod restarts is expected.
Tip
Tips for Success
Make sure you have all the permissions you need before you start.
Import your TLS certificate into OCI Certificate Service and have its OCID ready before configuring variables. The stack won’t accept a raw certificate/key pair.
Choose your Mattermost Installation Size carefully: it can’t be changed on an existing stack without recreating the PostgreSQL system.
To run
kubectlagainst the cluster (e.g. from OCI Cloud Shell), pull a kubeconfig using the OKE Cluster OCID and Deployment Region from the Application Information tab:oci ce cluster create-kubeconfig --cluster-id <oke_cluster_ocid> --region <deployment_region> --file $HOME/.kube/config --kube-endpoint PUBLIC_ENDPOINT --token-version 2.0.0. Runkubectl get nodesto confirm access.Always monitor logs from the Resource Manager job and from pods with
kubectl logsfor more specific error messages.For more details, see the official OCI Database with PostgreSQL documentation and OKE documentation.
Common Errors and How to Avoid Them
Error: Stack creation fails with missing permissions
Cause: IAM policies are not set properly for the user or group running the stack.
Solution: Ensure you have permissions for Resource Manager, OKE, Networking, OCI Database with PostgreSQL, Object Storage, and Certificate Service.
Error: Plan fails because a Mattermost license is required
Cause: Mattermost Installation Size is set above
100userswithout a license uploaded; larger sizes deploy in high-availability mode, which is Enterprise-licensed.Solution: Upload a valid Mattermost Enterprise license, or choose
100users.
Error: Mattermost URL doesn’t resolve after deployment
Cause: The DNS
Arecord for your FQDN hasn’t been created yet, or hasn’t propagated.Solution: Create an
Arecord from your Mattermost FQDN to themattermost_lb_ipoutput, then wait for DNS propagation.
Error: Certificate OCID rejected or ingress never becomes healthy
Cause: The OCI Certificate Service OCID doesn’t exist, isn’t in the same tenancy, or doesn’t match the configured FQDN.
Solution: Re-check the certificate in OCI Certificate Service and confirm the OCID was copied correctly.
Error: PostgreSQL password rejected
Cause: The PostgreSQL Admin Password or Mattermost Database Password doesn’t meet the required complexity rules (8–32 characters, upper/lowercase, number, special character; no quotes, backslashes, or semicolons).
Solution: Re-enter a password that satisfies the pattern shown in the field description.
Error: Terraform destroy fails on the PostgreSQL system or the bucket
Cause: The database system has destroy protection enabled by design, and OCI refuses to delete a non-empty Object Storage bucket.
Solution: Empty the bucket first, then disable the database’s lifecycle protection before destroying.
Important
You are responsible for Oracle Cloud Infrastructure costs for the resources you create. Oracle Cloud credits cannot be used to buy a Mattermost license.
Learn more about managing your Mattermost server by visiting the Administration Guide.
Frequently Asked Questions
Why are my pods failing with a CrashLoopBackOff error after adding a custom CA certificate to my Docker image?
You may see a CrashLoopBackOff error after adding a custom CA certificate to your Docker image’s /etc/ssl/certs directory and deploying it to your Kubernetes environment via the Mattermost Enterprise Edition Helm Chart. This issue typically arises because the custom CA certificate is not being recognized by the system’s certificate trust store, leading to TLS handshake failures when the application attempts to connect to services that require the custom CA.
While core functionality may remain operational, you may notice the following symptoms:
Pods stuck in a crashloop with the error message: backoff - restarting failed container in pod.
Debugging commands like
kubectl describeandkubectl logsprovide little to no valuable information.Integrations may be blocked.
Can I resolve this issue without rebuilding the Docker image?
Yes. We recommend using Kubernetes-native solutions to manage custom CA certificates to simplify deployment processes and minimize disruptions caused by image rebuilds. You can inject the certificate directly into the pod using Kubernetes resources instead of modifying the Docker image to manage custom CA certificates dynamically without needing to rebuild and redeploy your Docker image every time the certificate changes.
Use a Kubernetes secret to store your custom CA certificate and then mount it into the pod:
Create a Kubernetes secret with your custom CA certificate.
Mount the certificate into the pod using the Helm chart’s configuration options. This method simplifies management and avoids the need to rebuild your Docker image for future certificate updates.
Alternatively, to dynamically inject certificates without modifying the Docker image, use an initContainer to copy the certificate into the pod’s filesystem and update the certificate trust store before the main container starts.
How to troubleshoot the root cause of the CrashLoopBackOff error?
Use kubectl describe pods to check detailed event logs.
Consider logging tools like Grafana to aggregate and analyze logs for additional insights.
Where is data stored in a self-hosted Kubernetes deployment?
Where data is stored depends on the backend database (such as RDS, Azure Postgres, self-hosted PostgreSQL), and the backend filestore (such as AWS S3, other S3-compatible services, or a mounted volume) configured during deployment.
For volume mounts, we recommend using an NFS volume to provide filestores as a “local” directory to the Mattermost server.
Not all types of Kubernetes persistent volumes have been tested with Mattermost, and some may have limitations or specific configurations that may require additional setup to ensure proper permissions and access. We recommend system admins review documentation for their preferred persistent volume types and test to ensure compatibility with Mattermost.