High availability cluster-based deployment
![]() Available on Enterprise and Enterprise Advanced plans
Available on Enterprise and Enterprise Advanced plans
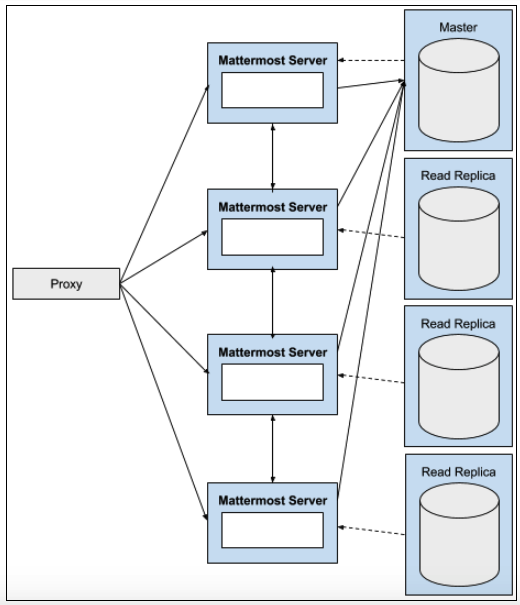
A high availability cluster-based deployment enables a Mattermost system to maintain service during outages and hardware failures through the use of redundant infrastructure.
High availability in Mattermost consists of running redundant Mattermost application servers, redundant database servers, and redundant load balancers. The failure of any one of these components does not interrupt operation of the system.
Mattermost Enterprise supports:
Clustered Mattermost servers, which minimize latency by:
Storing static assets over a global CDN.
Deploying multiple Mattermost servers to host API communication closer to the location of end users.
They can also be used to handle scale and failure handoffs in disaster recovery scenarios.
Database read replicas, where replicas can be:
Configured as a redundant backup to the active database server.
Used to scale up the number of concurrent users.
Deployed closer to the location of end users, reducing latency.
Moreover, search replicas are also supported to handle search queries.
Preparation
Review available reference architectures for guidance on scaling Mattermost for the applicable number of users. Reference architecture guidance includes recommendations for the number of Mattermost nodes, database writer and reader nodes, Elasticsearch nodes, and proxy nodes, as well as file storage estimates depending on anticipated usage patterns.
Determine whether the file storage configuration for Mattermost will be Amazon S3, an S3-compatible file storage service, or network-attached storage (NAS) mounted on each Mattermost node. If Mattermost nodes are left configured with local file system storage on the host file system on each node rather than a NAS location, high availability will not function correctly and may corrupt your file storage.
For Kubernetes deployments, review Deploy Mattermost on Kubernetes.
For non-Kubernetes deployments, install or upgrade Mattermost to the desired version on one server provisioned for Mattermost. Refer to Deploy Mattermost on Linux for installation details. Install a license key to apply an Enterprise or Enterprise Advanced license key to the installed node.
Recommended: If using
config.jsonfor Mattermost configuration, refer to Store configuration in your database to migrate the Mattermost instance to using the database for configuration. It is also possible to continue usingconfig.jsonfiles. However, when high availability is enabled, the System Console is set to read-only mode to ensure all theconfig.jsonfiles on the Mattermost servers are always identical.Review Calls self-hosted deployment to develop an appropriately-scaled Calls deployment plan.
If you anticipate your Mattermost server reaching more than 2.5 million posts, review Enterprise search for options to ensure optimum search performance.
For Mattermost deployments for more than 100,000 users, review the Redis deployment guide.
Deployment guide
Set up and maintain a high availability cluster-based deployment on your Mattermost servers.
Note
Back up your Mattermost database and file storage locations before configuring high availability. For more information about backing up, see Backup and disaster recovery.
Mattermost servers
Recommended: Store configuration in your database rather than
config.jsonto simplify configuration management across all servers in the cluster.Set up additional Mattermost servers: Provision additional Mattermost servers using an identical configuration to your current deployment.
Kubernetes deployments: Update the
replicasfield in thespecsection of yourmattermost-installation.yamlfile to the desired number of servers (e.g.,replicas: 2for a two-server cluster), then apply the updated manifest withkubectl apply -f mattermost-installation.yaml.Non-Kubernetes deployments: Follow the Deploy Mattermost on Linux instructions to install the same version of Mattermost on each additional server.
If configuration is stored in the database, ensure the
MM_CONFIGenvironment variable on each server points to the same database connection string. If usingconfig.jsonfiles, ensure each server has an identical copy.Configure system limits: On each Mattermost server, set the process limit to 8192 and the maximum number of open files to 65536.
Edit the systemd service file to set resource limits:
sudo sed -i '/\[Service\]/a LimitNOFILE=65536\nLimitNPROC=8192' /etc/systemd/system/mattermost.service
If you prefer to edit manually, add these lines in the
[Service]section of/etc/systemd/system/mattermost.service:[Service] LimitNOFILE=65536 LimitNPROC=8192
Reload systemd and restart the service to apply the limits:
sudo systemctl daemon-reload
sudo systemctl restart mattermost
Verify the limits are applied:
# Check the actual process limits
cat /proc/$(pgrep -f mattermost | head -1)/limits | grep -E "Max open files|Max processes"
You should see
Max open filesset to 65536.Optimize network settings: On each Mattermost server, configure kernel parameters to increase WebSocket connection limits and optimize TCP settings.
Create a sysctl configuration file for Mattermost:
sudo tee /etc/sysctl.d/mattermost.conf > /dev/null <<EOF
# Extending default port range to handle lots of concurrent connections.
net.ipv4.ip_local_port_range = 1025 65000

# Lowering the timeout to faster recycle connections in the FIN-WAIT-2 state.
net.ipv4.tcp_fin_timeout = 30

# Reuse TIME-WAIT sockets for new outgoing connections.
net.ipv4.tcp_tw_reuse = 1

# Bumping the limit of a listen() backlog.
# This is maximum number of established sockets (with an ACK)
# waiting to be accepted by the listening process.
net.core.somaxconn = 4096

# Increasing the maximum number of connection requests which have
# not received an acknowledgment from the client.
# This is helpful to handle sudden bursts of new incoming connections.
net.ipv4.tcp_max_syn_backlog = 8192

# This is tuned to be 2% of the available memory.
vm.min_free_kbytes = 167772

# Disabling slow start helps increasing overall throughput
# and performance of persistent single connections.
net.ipv4.tcp_slow_start_after_idle = 0

# These show a good performance improvement over defaults.
# More info at https://blog.cloudflare.com/http-2-prioritization-with-nginx/
net.ipv4.tcp_congestion_control = bbr
net.core.default_qdisc = fq
net.ipv4.tcp_notsent_lowat = 16384

# TCP buffer sizes are tuned for 10Gbit/s bandwidth and 0.5ms RTT (as measured intra EC2 cluster).
# This gives a BDP (bandwidth-delay-product) of 625000 bytes.
# The maximum socket buffer size for kernel autotuning is set to be 4x the BDP (2500000).
# The default socket buffer size is set to 1/4 BDP (156250).
net.ipv4.tcp_rmem = 4096 156250 2500000
net.ipv4.tcp_wmem = 4096 156250 2500000

# Bumping the theoretical maximum buffer size of receiving/sending sockets,
# either UDP, or TCP not using autotuning (i.e. using SO_RCVBUF)
net.core.rmem_max = 16777216
net.core.wmem_max = 16777216
EOF
Apply the settings immediately:
sudo sysctl -p /etc/sysctl.d/mattermost.conf
Enable time synchronization: Each server in the cluster must have synchronized time to ensure messages are posted in the correct order and cluster communication functions properly.
Ubuntu/Debian:
Modern Ubuntu systems use
systemd-timesyncdby default, which is usually already enabled. Verify time synchronization is working:timedatectl statusYou should see
System clock synchronized: yes. If time synchronization is not enabled, enable it with:sudo timedatectl set-ntp true
RHEL/CentOS/Rocky Linux:
sudo dnf install chrony
sudo systemctl enable chronyd
sudo systemctl start chronyd
Verify time synchronization is working:
chronyc sourcesVerify individual server functionality: Before enabling clustering, verify each server is functioning independently by accessing its private IP address directly.
Get the private IP address of each Mattermost server:
# Get all IP addresses for the server
hostname -I

# Or get the primary network interface IP
ip addr show | grep "inet " | grep -v 127.0.0.1 | awk '{print $2}' | cut -d/ -f1
Test that Mattermost is accessible on each server using its private IP address:
# Replace with your server's actual IP address
curl http://192.168.1.10:8065
You should see HTML output from the Mattermost application. Repeat this verification for each Mattermost server in your cluster.
Configure cluster settings: Enable high availability by configuring the
ClusterSettingssection. Use mmctl to set cluster settings:mmctl config set ClusterSettings.Enable true mmctl config set ClusterSettings.ClusterName production mmctl config set ClusterSettings.UseIPAddress true mmctl config set ClusterSettings.ReadOnlyConfig true mmctl config set ClusterSettings.GossipPort 8074
See the high availability configuration settings documentation for details on all available cluster settings, including
OverrideHostnamefor non-standard network configurations.Restart Mattermost servers: Restart each Mattermost server in the cluster to apply the new configuration.
sudo systemctl restart mattermost
Verify cluster communication: Open System Console > Environment > High Availability to verify that each server in the cluster is communicating as expected with green status indicators. If not, investigate the log files for additional information.
Proxy server
The proxy server exposes the cluster of Mattermost servers to external clients. The proxy distributes traffic across all Mattermost servers in the cluster and provides health checking to route traffic only to healthy servers.
Mattermost is designed to work with various load balancing solutions:
Software proxies: NGINX
Cloud load balancers: Amazon Elastic Load Balancer (ELB/ALB), Azure Load Balancer, Google Cloud Load Balancing
Hardware load balancers: F5 BIG-IP, Citrix NetScaler ADC, and other enterprise solutions
This section provides configuration instructions for NGINX, which is the most commonly used solution. If you’re using a cloud load balancer or hardware load balancer, consult your provider’s documentation for configuring health checks on the /api/v4/system/ping endpoint and load balancing across multiple backend servers.
Note
For detailed NGINX configuration, see Set up an NGINX proxy. This section focuses on the high availability-specific configuration, but the full proxy documentation includes additional optimizations and settings that are important for production deployments.
Important
For high-scale deployments, the NGINX proxy documentation includes additional main configuration optimizations (/etc/nginx/nginx.conf) that are critical for performance, including worker process settings, connection limits, and keepalive optimizations. See the NGINX main configuration optimizations section in the proxy documentation for these essential settings.
Install NGINX: Install NGINX on your proxy server(s).
Ubuntu/Debian:
sudo apt update
sudo apt install nginx
RHEL/CentOS:
sudo dnf install nginx
Configure high availability backend: Create an NGINX configuration that defines all Mattermost servers in the cluster with high-performance settings optimized for high availability deployments.
Set configuration variables for your environment:
# Ubuntu/Debian: Use sites-available directory
NGINX_CONF="/etc/nginx/sites-available/mattermost"

# RHEL/CentOS: Use conf.d directory instead
# NGINX_CONF="/etc/nginx/conf.d/mattermost.conf"

# Set your Mattermost server IP addresses
MM_SERVER_1="192.168.1.10"
MM_SERVER_2="192.168.1.11"

# Set your domain name
MM_DOMAIN="mattermost.example.com"
Create the NGINX configuration file with high-performance settings:
sudo tee "$NGINX_CONF" > /dev/null <<EOF
upstream backend {
      server ${MM_SERVER_1}:8065 max_fails=0;
      server ${MM_SERVER_2}:8065 max_fails=0;
      keepalive 256;
}

proxy_cache_path /var/cache/nginx levels=1:2 keys_zone=mattermost_cache:10m max_size=3g inactive=120m use_temp_path=off;

server {
  listen 80 reuseport;
  server_name ${MM_DOMAIN};

  location ~ /api/v[0-9]+/(users/)?websocket$ {
        proxy_set_header Upgrade \$http_upgrade;
        proxy_set_header Connection "upgrade";
        client_max_body_size 50M;
        proxy_set_header Host \$http_host;
        proxy_set_header X-Real-IP \$remote_addr;
        proxy_set_header X-Forwarded-For \$proxy_add_x_forwarded_for;
        proxy_set_header X-Forwarded-Proto \$scheme;
        proxy_set_header X-Frame-Options SAMEORIGIN;
        proxy_buffers 256 16k;
        proxy_buffer_size 16k;
        client_body_timeout 60s;
        send_timeout        300s;
        lingering_timeout   5s;
        proxy_connect_timeout   90s;
        proxy_send_timeout      300s;
        proxy_read_timeout      90s;
        proxy_http_version 1.1;
        proxy_pass http://backend;
  }

  location ~ /api/v[0-9]+/users/[a-z0-9]+/image\$ {
        proxy_set_header Connection "";
        client_max_body_size 50M;
        proxy_set_header Host \$http_host;
        proxy_set_header X-Real-IP \$remote_addr;
        proxy_set_header X-Forwarded-For \$proxy_add_x_forwarded_for;
        proxy_set_header X-Forwarded-Proto \$scheme;
        proxy_set_header X-Frame-Options SAMEORIGIN;
        proxy_buffers 256 16k;
        proxy_buffer_size 16k;
        proxy_read_timeout 600s;
        proxy_http_version 1.1;
        proxy_pass http://backend;
        proxy_cache mattermost_cache;
        proxy_cache_revalidate on;
        proxy_cache_min_uses 2;
        proxy_cache_use_stale timeout;
        proxy_cache_lock on;
        proxy_ignore_headers Cache-Control Expires;
        proxy_cache_valid 200 24h;
  }

  location / {
        proxy_set_header Connection "";
        client_max_body_size 50M;
        proxy_set_header Host \$http_host;
        proxy_set_header X-Real-IP \$remote_addr;
        proxy_set_header X-Forwarded-For \$proxy_add_x_forwarded_for;
        proxy_set_header X-Forwarded-Proto \$scheme;
        proxy_set_header X-Frame-Options SAMEORIGIN;
        proxy_buffers 256 16k;
        proxy_buffer_size 16k;
        proxy_read_timeout 600s;
        proxy_http_version 1.1;
        proxy_pass http://backend;
        proxy_cache mattermost_cache;
        proxy_cache_revalidate on;
        proxy_cache_min_uses 2;
        proxy_cache_use_stale timeout;
        proxy_cache_lock on;
  }
}
EOF
This configuration includes high-performance optimizations such as preventing servers from being marked unavailable (
max_fails=0), user image caching for 24 hours, and extended timeouts for long-running operations. For additional NGINX performance tuning options, including worker process optimization and advanced buffer settings, see the high-performance scaling configuration section.Enable the site configuration:
Ubuntu/Debian:
sudo ln -sf /etc/nginx/sites-available/mattermost /etc/nginx/sites-enabled/mattermost
sudo rm -f /etc/nginx/sites-enabled/default
RHEL/CentOS: The configuration file in
/etc/nginx/conf.d/is automatically enabled.Test and apply NGINX configuration:
sudo nginx -t
sudo systemctl restart nginx
sudo systemctl enable nginx
Configure TLS: For production deployments, configure TLS on your NGINX proxy. See Set up TLS for detailed instructions on configuring TLS with NGINX. You can either use Let’s Encrypt for automatic certificate management or provide your own TLS certificates.
Configure health checks: The upstream block above sets
max_fails=0, which disables NGINX’s passive quarantining - backends are not marked unavailable based on failed-request counts. Individual failed requests are still retried against other backends via NGINX’s defaultproxy_next_upstreambehavior. To detect failed servers and remove them from rotation, monitor the Mattermost API endpointhttp://SERVER_IP:8065/api/v4/system/ping(which returnsStatus 200for healthy servers) using an active health check at your load balancer or monitoring system.Verify proxy functionality: Test access through the proxy using your configured domain name and verify traffic is distributed across backend servers by checking Mattermost server logs.
File storage
In a high availability deployment, all Mattermost servers in the cluster must have access to the same file storage. Local file system storage on each individual server will not work correctly in HA and may corrupt your file storage.
Supported file storage options for high availability:
Amazon S3 or S3-compatible object storage (recommended)
Network-attached storage (NAS) using NFS or similar protocols
Important
If you’re currently using local file system storage ("DriverName": "local" with a local directory), you must migrate to shared storage before enabling high availability. Running HA with local storage on each node may cause file corruption and data loss.
Configure S3 or S3-compatible storage
Amazon S3 and S3-compatible storage solutions (such as MinIO, Digital Ocean Spaces, etc.) are the recommended file storage option for high availability deployments.
Configure file storage settings: Use mmctl or the System Console to configure S3 storage:
# Set storage driver to S3
mmctl config set FileSettings.DriverName amazons3

# Configure S3 bucket and region
mmctl config set FileSettings.AmazonS3Bucket your-bucket-name
mmctl config set FileSettings.AmazonS3Region us-east-1

# Configure S3 credentials (if not using IAM roles)
mmctl config set FileSettings.AmazonS3AccessKeyId your-access-key-id
mmctl config set FileSettings.AmazonS3SecretAccessKey your-secret-access-key
For S3-compatible storage (MinIO, etc.), also configure the endpoint:
mmctl config set FileSettings.AmazonS3Endpoint s3.your-domain.com
Verify configuration: Restart Mattermost and test file uploads to ensure files are being stored correctly in S3.
See the file storage configuration settings documentation for complete details on all available S3 configuration options.
Database
In a high availability deployment, the database requires careful configuration to ensure optimal performance and reliability. Mattermost supports using read replicas to distribute database load and search replicas to isolate search queries.
Danger
PostgreSQL configuration settings are critical for production stability
The PostgreSQL configuration settings documented below, particularly hot_standby and hot_standby_feedback for read replicas, are essential for preventing production outages. Failure to configure these settings correctly will result in outages for deployments at scale. These settings prevent query conflicts that can cause read replicas to terminate queries when the primary database has high write traffic.
Additionally, incorrect connection pool settings, missing vacuuming configuration, and suboptimal memory settings can severely impact performance and stability. Review and apply all recommended settings before deploying to production.
Understanding database query distribution
Mattermost distributes database queries across your database infrastructure as follows:
Write requests and some specific read requests are sent to the primary database
Read requests (excluding those that must go to the primary) are distributed among available read replicas. If no read replicas are configured, these are sent to the primary
Search requests are distributed among available search replicas. If no search replicas are configured, these are sent to the read replicas. If no read replicas are configured, they are sent to the primary
For detailed information on all database configuration options, see the database configuration settings documentation.
Amazon RDS Aurora PostgreSQL
Amazon Aurora PostgreSQL provides managed database service with built-in high availability and automatic failover capabilities.
Architecture overview:
Aurora automatically maintains multiple replicas across Availability Zones
The cluster provides a single writer endpoint that automatically points to the current primary instance
The cluster provides a reader endpoint that load balances across available read replicas
Aurora handles automatic failover, promoting a replica to primary when needed
Configure Mattermost for Aurora:
Configure the primary database connection: Point the DataSource to the Aurora cluster writer endpoint (not individual instance endpoints):
# Use the cluster writer endpoint for the primary connection
mmctl config set SqlSettings.DataSource "postgres://username:password@your-cluster.cluster-xxxxx.region.rds.amazonaws.com:5432/mattermost?sslmode=require&connect_timeout=10"
Important
Always use the cluster-level writer endpoint, not instance-specific endpoints. This allows Aurora to handle failover automatically by updating the DNS endpoint to point to the new primary.
Configure read replicas: Point directly to individual reader instance endpoints (not the reader endpoint). Create a configuration patch file:
# Create a configuration patch file
cat > /tmp/replica-config.json <<'EOF'
{
  "SqlSettings": {
    "DataSourceReplicas": [
      "postgres://username:password@your-cluster-instance-1.xxxxx.region.rds.amazonaws.com:5432/mattermost?sslmode=require&connect_timeout=10",
      "postgres://username:password@your-cluster-instance-2.xxxxx.region.rds.amazonaws.com:5432/mattermost?sslmode=require&connect_timeout=10"
    ]
  }
}
EOF

# Apply the configuration
mmctl config patch /tmp/replica-config.json

# Clean up the temporary file
rm /tmp/replica-config.json
Note
Use individual reader instance endpoints rather than the Aurora reader endpoint. Mattermost has its own load balancing logic for read queries and can failover to the primary connection if reader instances become unavailable.
Configure connection pool settings:
# Set connection pool limits (per database connection)
mmctl config set SqlSettings.MaxOpenConns 100
mmctl config set SqlSettings.MaxIdleConns 50
The recommended ratio is 2:1 (MaxOpenConns:MaxIdleConns). These settings apply per data source, so with one primary and two read replicas, the total maximum connections would be 300.
Verify database configuration: Restart Mattermost and check that database connections are healthy:
sudo systemctl restart mattermost

# Check logs for database connection messages
sudo journalctl -u mattermost -n 100
Amazon RDS and Aurora expose PostgreSQL configuration through DB parameter groups (RDS) and DB cluster parameter groups (Aurora), which let you tune memory, replication, and other settings. Aurora’s defaults are generally well-tuned for most workloads. Monitor performance using Amazon CloudWatch and the RDS Performance Insights feature.
Self-managed PostgreSQL
For self-managed PostgreSQL deployments, you have full control over database configuration and must configure replication, backups, and PostgreSQL settings yourself.
Set up PostgreSQL replication:
Configure the primary database server for replication by editing
postgresql.conf:Ubuntu/Debian: Edit
/etc/postgresql/{version}/main/postgresql.conf(e.g.,/etc/postgresql/14/main/postgresql.conf)RHEL/CentOS: Edit
/var/lib/pgsql/{version}/data/postgresql.conf(e.g.,/var/lib/pgsql/14/data/postgresql.conf)# Enable replication wal_level = replica max_wal_senders = 10 max_replication_slots = 10 # Configure write-ahead log archiving (recommended) archive_mode = on archive_command = 'cp %p /var/lib/postgresql/wal_archive/%f'
After editing, restart PostgreSQL:
sudo systemctl restart postgresql
Configure replication access in
pg_hba.confon the primary:Ubuntu/Debian: Edit
/etc/postgresql/{version}/main/pg_hba.confRHEL/CentOS: Edit
/var/lib/pgsql/{version}/data/pg_hba.conf# Allow replication connections from replica servers # Replace REPLICA_IP with your replica server IP addresses host replication replication_user REPLICA_IP/32 scram-sha-256
Create a replication user on the primary:
CREATE ROLE replication_user WITH REPLICATION LOGIN PASSWORD 'secure_password';
Create the replica using
pg_basebackup. Stop PostgreSQL on the replica and ensure the data directory is empty before running this command.# On the replica server, create base backup from primary. # Replace DATA_DIR with the platform-specific data directory: # Ubuntu/Debian: /var/lib/postgresql/{version}/main # RHEL/CentOS: /var/lib/pgsql/{version}/data sudo -u postgres pg_basebackup -h PRIMARY_IP -D DATA_DIR -U replication_user -P -v -R -X stream
The
-Rflag automatically creates thestandby.signalfile and configures replication settings.Start the replica server:
sudo systemctl start postgresql
sudo systemctl enable postgresql
Verify replication status on the primary:
SELECT client_addr, state, sync_state FROM pg_stat_replication;
Configure Mattermost for self-managed PostgreSQL:
Configure database connections using mmctl or environment variables:
# Primary database connection
mmctl config set SqlSettings.DataSource "postgres://mattermost_user:password@primary-db.example.com:5432/mattermost?sslmode=require&connect_timeout=10"

# Read replica connections - create a configuration patch file
cat > /tmp/replica-config.json <<'EOF'
{
  "SqlSettings": {
    "DataSourceReplicas": [
      "postgres://mattermost_user:password@replica1-db.example.com:5432/mattermost?sslmode=require&connect_timeout=10",
      "postgres://mattermost_user:password@replica2-db.example.com:5432/mattermost?sslmode=require&connect_timeout=10"
    ]
  }
}
EOF

# Apply the replica configuration
mmctl config patch /tmp/replica-config.json

# Clean up the temporary file
rm /tmp/replica-config.json

# Connection pool settings
mmctl config set SqlSettings.MaxOpenConns 100
mmctl config set SqlSettings.MaxIdleConns 50
Apply configuration changes without restarting Mattermost (if already running):
Go to System Console > Environment > Web Server, then select Reload Configuration from Disk, followed by System Console > Environment > Database and select Recycle Database Connections.
Alternatively, restart the Mattermost service:
sudo systemctl restart mattermost
Recommended PostgreSQL configuration settings:
The following settings are critical for production deployments. These were tested on AWS Aurora r5.xlarge instances but apply to any PostgreSQL deployment with similar specifications.
Primary/Writer node configuration:
Edit postgresql.conf on the primary database server:
Ubuntu/Debian:
/etc/postgresql/{version}/main/postgresql.confRHEL/CentOS:
/var/lib/pgsql/{version}/data/postgresql.conf
Add or modify the following settings:
# Connection settings
# Adjust based on your hardware - this is for r5.xlarge or equivalent
# Coordinate with Mattermost MaxOpenConns setting
max_connections = 1024

# Random page cost - set to 1.1 for SSD storage
# Use default 4.0 for spinning disks
random_page_cost = 1.1

# Work memory - use 32MB with read replicas, 16MB for single instance
# Adjust downward for smaller instances
work_mem = 32MB

# Cache and buffer settings
# Set to 65% of total memory for dedicated database servers
# For 32GB RAM instance, use 21GB
# For smaller servers (e.g., 4GB RAM), use 20% or less (e.g., 512MB)
effective_cache_size = 21GB
shared_buffers = 21GB

# Maintenance work memory
# Use 1GB for 32GB+ RAM servers, 512MB for smaller servers
maintenance_work_mem = 1GB

# Autovacuum settings
autovacuum_max_workers = 4
autovacuum_vacuum_cost_limit = 500

# Parallel query settings (for servers with 32+ CPUs)
max_worker_processes = 12
max_parallel_workers_per_gather = 4
max_parallel_workers = 12
max_parallel_maintenance_workers = 4

# TCP keepalive settings
# If using pgbouncer or connection pooling proxy, apply these to the proxy
# and revert to defaults on the database
tcp_keepalives_idle = 5
tcp_keepalives_interval = 1
tcp_keepalives_count = 5
Read replica node configuration:
Edit postgresql.conf on each read replica server and copy all primary settings above, then modify or add the following:
# Work memory - use 16MB on replicas, 32MB on primary
work_mem = 16MB

# Hot standby settings - CRITICAL FOR PRODUCTION STABILITY
# These settings prevent query cancellations when primary has write activity
# Without these settings, high write traffic can cause read queries to fail
hot_standby = on
hot_standby_feedback = on
Warning
The hot_standby_feedback setting is essential for production stability. Without it, high write traffic on the primary can cause the replica to cancel long-running read queries, leading to application errors and degraded performance.
After editing configuration files on the primary or replicas, restart PostgreSQL for changes to take effect:
sudo systemctl restart postgresql
Vacuuming and maintenance:
PostgreSQL performance is highly dependent on regular vacuuming. Monitor vacuum activity:
-- Check vacuum status for top 10 tables with most dead tuples
SELECT relname, n_tup_ins as inserts, n_tup_upd as updates, n_tup_del as deletes,
       n_live_tup as live_tuples, n_dead_tup as dead_tuples, n_mod_since_analyze,
       last_autovacuum, last_autoanalyze, autovacuum_count, autoanalyze_count
FROM pg_stat_user_tables
ORDER BY dead_tuples DESC
LIMIT 10;
If you see more than 50,000 dead tuples on a table, or if last_autovacuum shows the table hasn’t been vacuumed in months, tune table-specific autovacuum settings:
-- Example: More aggressive vacuuming for high-activity tables
ALTER TABLE posts SET (
  autovacuum_vacuum_scale_factor = 0.1,    -- default is 0.2
  autovacuum_analyze_scale_factor = 0.05,  -- default is 0.1
  autovacuum_vacuum_cost_limit = 1000      -- default is 200
);
Adjust these values based on your monitoring data. See the PostgreSQL autovacuum documentation for details on how PostgreSQL calculates when to run autovacuum.
Search replicas
For large deployments, consider configuring dedicated search replicas to isolate resource-intensive search queries from regular database operations.
Search replicas are PostgreSQL read replicas that are configured in Mattermost specifically to handle search queries:
# Configure dedicated search replicas - create a configuration patch file
cat > /tmp/search-replica-config.json <<'EOF'
{
  "SqlSettings": {
    "DataSourceSearchReplicas": [
      "postgres://mattermost_user:password@search-replica1.example.com:5432/mattermost?sslmode=require&connect_timeout=10",
      "postgres://mattermost_user:password@search-replica2.example.com:5432/mattermost?sslmode=require&connect_timeout=10"
    ]
  }
}
EOF

# Apply the search replica configuration
mmctl config patch /tmp/search-replica-config.json

# Clean up the temporary file
rm /tmp/search-replica-config.json
Search replicas use the same PostgreSQL configuration as regular read replicas. When configured, all search queries are distributed among the search replicas. If search replicas are unavailable, queries fall back to read replicas, and ultimately to the primary database.
For deployments requiring advanced search capabilities, see Enterprise search for information on Elasticsearch integration.
Database sizing
Database sizing depends on your expected user count and usage patterns. See the Hardware requirements for enterprise deployments (multi-server) documentation for more information.
Key considerations:
Size your primary and replica databases to handle 100% of the load independently to ensure availability during failover scenarios
Monitor database CPU, memory, and I/O metrics to identify when additional read replicas are needed
Plan for growth - database storage grows based on message history, file metadata, and retention policies
Database failover and disaster recovery
Manual failover:
If you need to manually promote a read replica to primary (for maintenance, disaster recovery, or other operational needs):
Verify the replica is synchronized before promoting. Promoting a replica that hasn’t caught up with the primary will lose any WAL data that wasn’t replayed.
On the replica server, check replication status:
SELECT pg_last_wal_receive_lsn(), pg_last_wal_replay_lsn(),
       pg_last_wal_replay_lsn() = pg_last_wal_receive_lsn() AS synced;
Wait until
syncedreturnstruebefore continuing. In an unplanned failover where the primary is already unreachable, this check confirms what was replicated before the primary failed rather than guaranteeing zero data loss.Promote the replica to primary:
For self-managed PostgreSQL:
# On the replica server.
# Replace DATA_DIR with the platform-specific data directory:
#   Ubuntu/Debian: /var/lib/postgresql/{version}/main
#   RHEL/CentOS: /var/lib/pgsql/{version}/data
sudo -u postgres pg_ctl promote -D DATA_DIR
For Amazon RDS:
Use the AWS Console or CLI to promote the read replica to a standalone instance.
Update Mattermost configuration to point to the new primary:
# Update the DataSource to point to the new primary
mmctl config set SqlSettings.DataSource "postgres://user:password@new-primary.example.com:5432/mattermost?sslmode=require"
Reload configuration without downtime:
Go to System Console > Environment > Web Server → Reload Configuration from Disk
Go to System Console > Environment > Database → Recycle Database Connections
Users may experience a brief interruption (similar to network disconnection) while connections are recycled.
Disaster recovery:
For comprehensive disaster recovery planning:
Implement regular database backups using
pg_dump,pg_basebackup, or managed backup servicesTest restore procedures regularly
Document and practice failover procedures
Consider cross-region replication for geographic redundancy (note: multi-region Mattermost clusters are not officially supported but can work with proper network configuration)
See the backup and disaster recovery documentation for more information.
Next steps
Once your high availability cluster is deployed and operational, consider these additional scaling optimizations based on your deployment size and requirements:
Calls deployment
If you’re using Mattermost Calls for voice and screen sharing communication, review Calls self-hosted deployment to plan an appropriately-scaled Calls infrastructure that matches your HA deployment.
Enterprise search
For deployments expected to exceed 2.5 million posts, consider implementing Enterprise search with Elasticsearch. Elasticsearch provides significantly faster search performance and advanced search capabilities for large-scale deployments.
Redis integration
For deployments serving more than 100,000 users, implement Redis to improve session management, caching, and real-time communication performance across your cluster.
Performance monitoring
Deploy Prometheus and Grafana to monitor your high availability cluster’s health, performance metrics, and resource utilization. Comprehensive monitoring is essential for identifying bottlenecks, planning capacity, and maintaining optimal performance.
Operations and maintenance
This section covers the operational aspects of managing and maintaining your high availability cluster after deployment.
Cluster discovery
If you have non-standard (i.e. complex) network configurations, then you may need to use the Override Hostname setting to help the cluster nodes discover each other. The cluster settings in the config are removed from the config file hash for this reason, meaning you can have slightly different cluster configuration settings in high availability mode. The Override Hostname is intended to be different for each clustered node if you need to force discovery.
If UseIPAddress is set to true, it attempts to obtain the IP address by searching for the first non-local IP address (non-loop-back, non-localunicast, non-localmulticast network interface). It enumerates the network interfaces using the built-in go function net.InterfaceAddrs(). Otherwise it tries to get the hostname using the os.Hostname() built-in go function.
You can also run SELECT * FROM ClusterDiscovery against your database to see how it has filled in the Hostname field. That field will be the hostname or IP address the server will use to attempt contact with other nodes in the cluster. We attempt to make a connection to the url Hostname:Port and Hostname:PortGossipPort. You must also make sure you have all the correct ports open so the cluster can gossip correctly. These ports are under ClusterSettings in your configuration.
In short, you should use:
IP address discovery if the first non-local address can be seen from the other machines.
Override Hostname on the operating system so that it’s a proper discoverable name for the other nodes in the cluster.
Override Hostname in your server configuration if the above steps do not work. You can put an IP address in this field if needed. If using
config.jsonfiles, this setting will be different for each cluster node.
State
The Mattermost server is designed to have very little state to allow for horizontal scaling. The items in state considered for scaling Mattermost are listed below:
In memory session cache for quick validation and channel access.
In memory online/offline cache for quick response.
System configuration file that is loaded and stored in memory.
WebSocket connections from clients used to send messages.
When the Mattermost server is configured for high availability, the servers use an inter-node communication protocol on a different listening address to keep the state in sync. When a state changes it is written back to the database and an inter-node message is sent to notify the other servers of the state change. The true state of the items can always be read from the database. Mattermost also uses inter-node communication to forward WebSocket messages to the other servers in the cluster for real-time messages such as “[User X] is typing.”
Leader election
A cluster leader election process assigns any scheduled task such as LDAP sync to run on a single node in a multi-node cluster environment.
The process is based on a widely used bully leader election algorithm where the process with the lowest node ID number from amongst the non-failed processes is selected as the leader.
Note
From Mattermost v11.4, debug-level log messages help identify which node is executing specific Recurring Tasks (Scheduled Posts, Post Reminders, and DND Status Reset). Non-leader nodes log messages like Skipping scheduled posts job startup since this is not the leader node to indicate they are correctly deferring execution of these Recurring Tasks to the leader. These are normal operational messages, not errors. These debug messages do not apply to other job types such as Elasticsearch indexing, SAML sync, or LDAP sync. See Cluster job execution debug messages for details.
Job server
Mattermost runs periodic tasks via the job server. These tasks include:
LDAP sync
Data retention
Compliance exports
Elasticsearch indexing
Scheduled posts
DND status reset
Post reminders
Make sure you have set JobSettings.RunScheduler to true for all app and job servers in the cluster. The cluster leader will then be responsible for scheduling recurring jobs.
You can verify this setting using mmctl:
mmctl config get JobSettings.RunScheduler
If you need to set it (it defaults to true):
mmctl config set JobSettings.RunScheduler true
Note
We strongly recommend not changing this setting from the default setting of
trueas this prevents theClusterLeaderfrom being able to run the scheduler. As a result, recurring jobs such as LDAP sync, Compliance Export, and data retention will no longer be scheduled. In previous Mattermost Server versions, and this documentation, the instructions stated to run the Job Server withRunScheduler: false. The cluster design has evolved and this is no longer the case.From Mattermost v11.4, you can verify that Recurring Tasks (Scheduled Posts, Post Reminders, and DND Status Reset) are running on the correct node by enabling debug logging. Non-leader nodes will log messages indicating they are skipping execution of these specific Recurring Tasks, which is expected behavior. These debug messages don’t apply to other job types. See Cluster job execution debug messages for more information.
Plugins and High Availability
When you install or upgrade a plugin, it’s propagated across the servers in the cluster automatically. File storage is assumed to be shared between all the servers, using services such as NAS or Amazon S3.
If "DriverName": "local" is used then the directory at "FileSettings": "Directory": "./data/" is expected to be a NAS location mapped as a local directory. If this is not the case High Availability will not function correctly and may corrupt your file storage.
When you reinstall a plugin in v5.14, the previous Enabled or Disabled state is retained. As of v5.15, a reinstalled plugin’s initial state is Disabled.
CLI and High Availability
The CLI is run in a single node which bypasses the mechanisms that a high availability environment uses to perform actions across all nodes in the cluster. As a result, when running CLI commands in a High Availability environment, tasks such as updating and deleting users or changing configuration settings require a server restart.
We recommend using mmctl in a high availability environment instead since a server restart is not required. These changes are made through the API layer, so the node receiving the change request notifies all other nodes in the cluster.
Upgrade guide
An update is an incremental change to Mattermost server that fixes bugs or performance issues. An upgrade adds new or improved functionality to the server.
Tip
To learn how to safely upgrade your deployment in Kubernetes for High Availability and Active/Active support, see the Upgrading Mattermost in Kubernetes and High Availability Environments documenation.
Update configuration changes while operating continuously
A service interruption is not required for most configuration updates. See the section below for details on upgrades requiring service interruption. You can apply updates during a period of low load, but if your high availability cluster-based deployment is sized correctly, you can do it at any time. The system downtime is brief, and depends on the number of Mattermost servers in your cluster. Note that you are not restarting the machines, only the Mattermost server applications. A Mattermost server restart generally takes about five seconds.
If using database configuration (recommended):
Use mmctl to update configuration settings. Changes are automatically propagated to all servers in the cluster:
mmctl config set <setting> <value>
For example:
mmctl config set TeamSettings.MaxUsersPerTeam 100
If using config.json files:
Note
Don’t modify configuration settings through the System Console when using config.json files, otherwise you’ll have two servers with different configuration files in a high availability cluster-based deployment causing a refresh every time a user connects to a different app server.
Make a backup of your existing
config.jsonfile.For one of the Mattermost servers, make the configuration changes to
config.jsonand save the file. Do not reload the file yet.Copy the
config.jsonfile to the other servers.Shut down Mattermost on all but one server.
Reload the configuration file on the server that is still running. Go to System Console > Environment > Web Server, then select Reload Configuration from Disk.
Start the other servers.
Update the Server version while operating continuously
A service interruption is not required for security patch dot releases of Mattermost Server. You can apply updates during a period when the anticipated load is small enough that one server can carry the full load of the system during the update.
Note
Mattermost supports one minor version difference between the server versions when performing a rolling upgrade (for example v11.4.1 + v11.4.2 or v11.3.2 + v11.4.2 is supported, whereas v11.1.3 + v11.4.0 is not supported). Running two different versions of Mattermost in your cluster should not be done outside of an upgrade scenario.
When restarting, you aren’t restarting the machines, only the Mattermost server applications. A Mattermost server restart generally takes about five seconds.
Review the upgrade procedure in the Upgrade Enterprise Edition section of Upgrade Mattermost Server.
Back up your Mattermost database. If using
config.jsonfiles for configuration, also back up your configuration file.Set your proxy to move all new requests to a single server. If you are using NGINX and it’s configured with an upstream backend section in
/etc/nginx/sites-available/mattermostthen comment out all but the one server that you intend to update first, and reload NGINX.Shut down Mattermost on each server except the one that you are updating first.
Update each Mattermost instance that is shut down.
If using
config.jsonfiles, replace the newconfig.jsonfile on each server with your backed up copy.Start the Mattermost servers.
Repeat the update procedure for the server that was left running.
Server upgrades requiring service interruption
A service interruption is required when the upgrade includes a change to the database schema or when a change to server configuration requires a server restart, such as when making the following changes:
Default server language
Rate limiting
Webserver mode
Database
High availability
If the upgrade includes a change to the database schema, the database is upgraded by the first server that starts.
Apply upgrades during a period of low load. The system downtime is brief, and depends on the number of Mattermost servers in your cluster. Note that you are not restarting the machines, only the Mattermost server applications.
Review the upgrade procedure in the Upgrade Enterprise Edition section of Upgrade Mattermost Server.
Back up your Mattermost database. If using
config.jsonfiles for configuration, also back up your configuration file.Stop NGINX.
Upgrade each Mattermost instance.
If using
config.jsonfiles, replace the newconfig.jsonfile on each server with your backed up copy.Start one of the Mattermost servers.
When the server is running, start the other servers.
Restart NGINX.
All cluster nodes must use a single protocol
All cluster traffic uses the gossip protocol. Gossip clustering can no longer be disabled.
When upgrading a high availability cluster-based deployment, you can’t upgrade other nodes in the cluster when one node isn’t using the gossip protocol. You must use gossip to complete this type of upgrade. Alternatively you can shut down all nodes and bring them all up individually following an upgrade.
Requirements for continuous operation
To enable continuous operation at all times, including during server updates and server upgrades, you must make sure that the redundant components are properly sized and that you follow the correct sequence for updating each of the system’s components.
- Redundancy at anticipated scale
Upon failure of one component, the remaining application servers, database servers, and load balancers must be sized and configured to carry the full load of the system. If this requirement is not met, an outage of one component can result in an overload of the remaining components, causing a complete system outage.
- Update sequence for continuous operation
You can apply most configuration changes and dot release security updates without interrupting service, provided that you update the system components in the correct sequence. See the upgrade guide for instructions on how to do this.
Exception: Changes to configuration settings that require a server restart, and server version upgrades that involve a change to the database schema, require a short period of downtime. Downtime for a server restart is around five seconds. For a database schema update, downtime can be up to 30 seconds.
Important
Mattermost does not support high availability deployments spanning multiple datacenters. All nodes in a high availability cluster must reside within the same datacenter to ensure proper functionality and performance.
Frequently asked questions (FAQ)
Does Mattermost support multi-region high availability cluster-based deployment?
Yes. Although not officially tested, you can set up a cluster across AWS regions, for example, and it should work without issues.
What does Mattermost recommend for disaster recovery of the databases?
When deploying Mattermost in a high availability configuration, we recommend using a database load balancer between Mattermost and your database. Depending on your deployment this needs more or less consideration.
For example, if you’re deploying Mattermost on AWS with Amazon Aurora we recommend utilizing multiple Availability Zones. If you’re deploying Mattermost on your own cluster please consult with your IT team for a solution best suited for your existing architecture.
How to find the hostname of the connected websocket?
From Mattermost v10.4, Enterprise customers running self-hosted deployments can go to the Product menu  and select About Mattermost to see the hostname of the node in the cluster running Mattermost.
Troubleshooting
Capture high availability troubleshooting data
When deploying Mattermost in a high availability configuration, we recommend that you keep Prometheus and Grafana metrics as well as cluster server logs for as long as possible - and at minimum two weeks.
You may be asked to provide this data to Mattermost for analysis and troubleshooting purposes.
Note
Ensure that server log files are being created. You can find more on working with Mattermost logs here.
When investigating and replicating issues, we recommend opening System Console > Environment > Logging and setting File Log Level to DEBUG for more complete logs. Make sure to revert to INFO after troubleshooting to save disk space.
Each server has its own server log file, so make sure to provide server logs for all servers in your High Availability cluster-based deployment.
Red server status
When high availability mode is enabled, the System Console displays the server status as red or green, indicating if the servers are communicating correctly with the cluster. The servers use inter-node communication to ping the other machines in the cluster, and once a ping is established the servers exchange information, such as server version and configuration files.
A server status of red can occur for the following reasons:
Configuration file mismatch: Mattermost will still attempt the inter-node communication, but the System Console will show a red status for the server since the high availability mode feature assumes the same configuration file to function properly.
Server version mismatch: Mattermost will still attempt the inter-node communication, but the System Console will show a red status for the server since the high availability mode feature assumes the same version of Mattermost is installed on each server in the cluster. It is recommended to use the latest version of Mattermost on all servers. Follow the upgrade procedure in Upgrade Mattermost Server for any server that needs to be upgraded.
Server is down: If an inter-node communication fails to send a message it makes another attempt in 15 seconds. If the second attempt fails, the server is assumed to be down. An error message is written to the logs and the System Console shows a status of red for that server. The inter-node communication continues to ping the down server in 15 second intervals. When the server comes back up, any new messages are sent to it.
WebSocket disconnect
When a client WebSocket receives a disconnect it will automatically attempt to re-establish a connection every three seconds with a backoff. After the connection is established, the client attempts to receive any messages that were sent while it was disconnected.
App refreshes continuously
When using config.json files for configuration, if configuration settings are modified through the System Console, the client refreshes every time a user connects to a different app server. This occurs because the servers have different configuration files in a high availability cluster-based deployment.
Solution:
If using database configuration (recommended), modify settings through the System Console or mmctl. Changes are automatically synchronized across all servers.
If using
config.jsonfiles, modify configuration settings directly in the files following these steps.
Messages do not post until after reloading
When running in high availability mode, make sure all Mattermost application servers are running the same version of Mattermost. If they are running different versions, it can lead to a state where the lower version app server cannot handle a request and the request will not be sent until the frontend application is refreshed and sent to a server with a valid Mattermost version. Symptoms to look for include requests failing seemingly at random or a single application server having a drastic rise in goroutines and API errors.