Deploy Mattermost on Kubernetes#
Mattermost server can be deployed on various Kubernetes platforms, providing a scalable and robust infrastructure for your team communication needs. This guide covers deployment options for major cloud providers and general Kubernetes installations.
Choose your preferred platform below for specific deployment instructions:
You can use a supported Azure Marketplace Container Offer to install Mattermost on your existing Azure infrastructure.
Before you begin
Before deploying, make sure you have the following:
An AKS cluster: with the Application Gateway Ingress Controller (AGIC) add-on enabled or another Ingress controller deployed.
PostgreSQL v13.0+ database: Azure Database for PostgreSQL - Flexible Server with Private Access is recommended. Deploy one by following this Microsoft quick start guide.
Private Network Connectivity: Verify that there is network connectivity between your AKS cluster and the PostgreSQL database.
Valid DNS name and TLS certificate: You must have access to a DNS zone and provide a valid TLS key and certificate for the Ingress Controller.
Node Capacity: At least 2 AKS nodes for high availability when deploying for 100 users or more.
License Key: Trial or Enterprise license to test high availability and other Enterprise features.
Installation steps
The installation process includes deploying Mattermost and updating the server.
Step 1: Deploy Mattermost
Deploy Mattermost from the Azure Marketplace Container Offer and select Get it now.
Alternatively, you can go to the
Extensions + Applicationssection of your AKS cluster and install the Mattermost offering from there. Visit the Microsoft cluster extensions documentation to learn more.
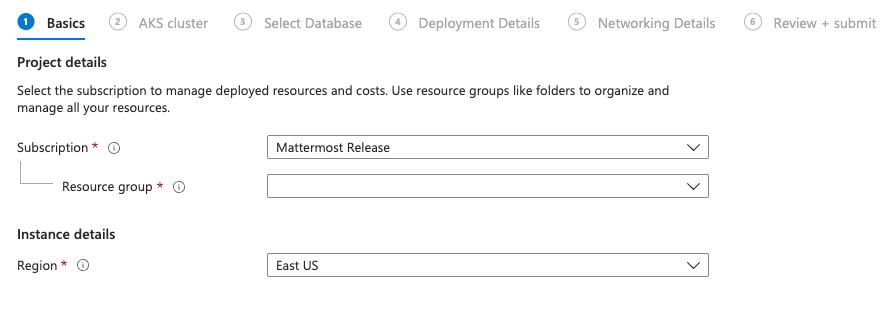
Choose the Resource Group and the Region of your installed AKS and PostgreSQL database.
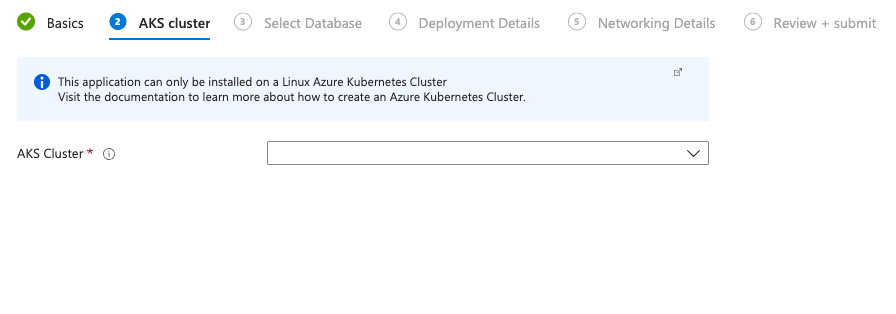
Choose your AKS cluster.
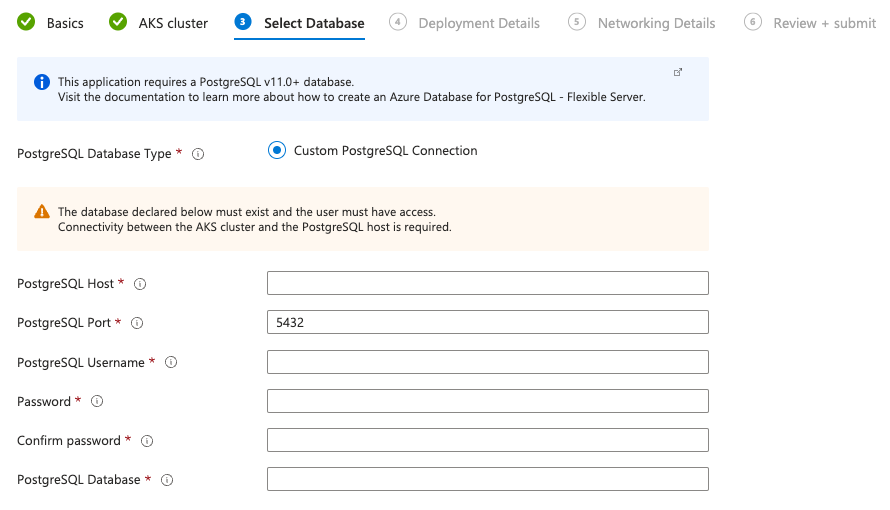
Fill in the details for your PostgreSQL database. Ensure the user specified has full access.
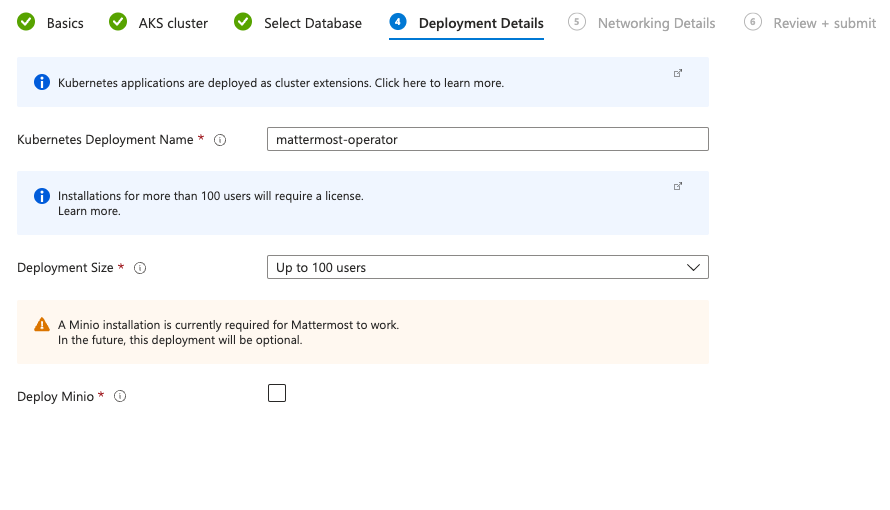
Specify Deployment Details including Deployment Name and Deployment Size. Click the checkbox to Deploy Minio, a required utility for this installation that will provide filestore functionality for your Mattermost instance.
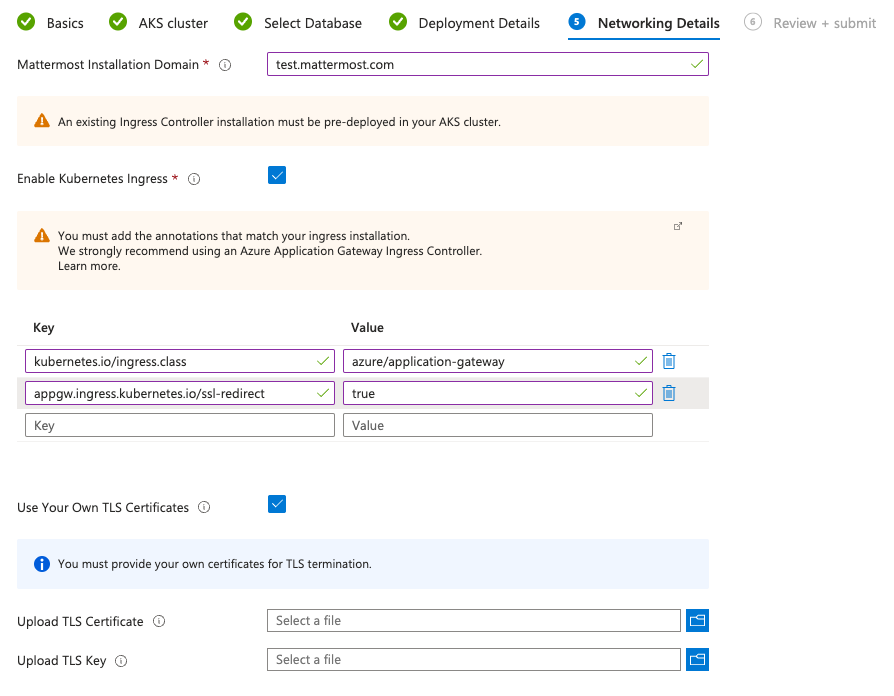
Configure Mattermost installation hostname and Ingress details. The AGIC add-on is used in the following example to show the ingress annotations required.
You can use any pre-installed Ingress Controller in your cluster as long as it supports Kubernetes Ingress and TLS termination.
kubernetes.io/ingress.class: azure/application-gateway
appgw.ingress.kubernetes.io/ssl-redirect: "true"
Additionally, we recommend considering:
Enforcing a minimum TLS version (e.g., TLS 1.2).
Deploying a Web Application Firewall (WAF) for additional protection, if supported by your ingress controller.
Limiting access using Kubernetes Network Policies.
Ensure that everything is running. You should be able to check the installed plugin from the AKS Extensions + Applications page under the Settings menu.
When the deployment is complete, obtain the hostname or IP address of your Mattermost deployment using the following command:
kubectl -n mattermost-operator get ingress
Use your IP address from the
ADDRESScolumn, and create a DNS record in your domain registration service.Access your working Mattermost installation at the URL you’ve determined in your DNS record.
Learn more about administrating your Mattermost server by visiting the Administration Guide.
Step 2: Upgrade Mattermost via your AKS cluster
Visit the
Extensions + Applicationssection of your AKS cluster where your Mattermost installation is deployed.You can enable minor version auto upgrades since these are not updating Mattermost version
Expand the
Configuration Settingstable and add the below configuration and the version you want to install as a value.
 global.azure.mattermost.version

.. image:: /_static/images/global-azure-mattermost-version.png
 :alt: An example of using custom Mattermost version.
Select Save and wait for the upgrade.
Important
You are responsible for Azure costs associated with any infrastructure you spin up to host a Mattermost server, and Azure credits cannot be applied towards the purchase of a Mattermost license.
You can use the Mattermost Kubernetes Operator to deploy Mattermost on Kubernetes using S3-compatible storage and a managed database service. While the operator supports a range of configurations, we strongly recommend using a cloud-native approach for production environments.
Prerequisites
Before you begin, ensure you have the following:
A functioning Kubernetes cluster (see the Kubernetes setup guide). Your cluster should be running a supported Kubernetes version.
The kubectl command-line tool installed on your local machine (see the kubectl installation guide).
A fundamental understanding of Kubernetes concepts, such as deployments, pods, and applying manifests.
Sufficient Kubernetes resources allocated based on your expected user load. Consult the Mattermost Kubernetes Operator documentation for resource requirements at different scales.
Installation steps
The installation process involves setting up necessary operators and then deploying Mattermost itself.
Step 1: Install the NGINX Ingress Controller
Follow the instructions in the Kubernetes deployment documentation to install the NGINX ingress controller on your Kubernetes cluster. Mattermost recommends installing the Nginx Operator via helm, regardless of platform you are installing to.
Step 2: Install the Mattermost Operator
The Mattermost Kubernetes Operator can be installed using Helm.
Install Helm (version 3.13.0 or later). See the Helm quickstart documentation for installation instructions.
Add the Mattermost Helm repository:
helm repo add mattermost https://helm.mattermost.com
Create a file named
config.yamland populate it with the contents of the Mattermost operator values file. This file allows for customization of the operator.Create a namespace for the Mattermost Operator:
kubectl create ns mattermost-operator
Install the Mattermost Operator. If you don’t specify a version, the latest version of the Mattermost Operator will be installed.
helm install <your-release-name> mattermost/mattermost-operator -n <namespace_name>For example:
helm install mattermost-operator mattermost/mattermost-operator -n mattermost-operatorTo use your custom
config.yamlfile:helm install mattermost-operator mattermost/mattermost-operator -n mattermost-operator -f config.yaml
Step 3: Deploy Mattermost
Note
A Mattermost Enterprise license is required for multi-server deployments.
For single-server deployments without an Enterprise license, add
Replicas: 1to thespecsection in step 2 below. See the high availability documentation for more on highly-available deployments.
(Mattermost Enterprise only) Create a Mattermost license secret. Create a file named
mattermost-license-secret.yamlwith the following content, replacing[LICENSE_FILE_CONTENTS]with your actual license:
apiVersion: v1
kind: Secret
metadata:
  name: my-mattermost-license
type: Opaque
stringData:
  license: <LICENSE_FILE_CONTENTS>
Create a Mattermost installation manifest file named
mattermost-installation.yaml. File names in this guide are suggestions; you can use different names. Use the following template, adjusting the values as needed:
apiVersion: installation.mattermost.com/v1beta1
kind: Mattermost
metadata:
  name: <INSTALLATION_NAME_HERE>        # Example: mm-example-full
spec:
  size: <SIZE_VALUE_HERE>               # Example: 5000users
  ingress:
    enabled: true
    host: <FULL_DOMAIN_NAME_HERE>       # Example: example.mattermost-example.com
    annotations:
      kubernetes.io/ingress.class: nginx
version: <VERSION_HERE>               # Example: 9.3.0
licenseSecret: ""                     # If you created a license secret, put the name here
Key fields in the manifest include:
metadata.name: The name of your Mattermost deployment in Kubernetes.
spec.size: The size of your installation (e.g., “100users”, “1000users”, etc.).
spec.ingress.host: The DNS name for your Mattermost installation.
spec.version: The Mattermost version. See the server version archive for available versions.
spec.licenseSecret: The name of the Kubernetes secret containing your license (required for Enterprise).For a full list of configurable fields, see the example manifest and the Custom Resource Definition.
Create a file named
mattermost-database-secret.yamlfor database credentials. This secret must be in the same namespace as the Mattermost installation.
apiVersion: v1
data:
  DB_CONNECTION_CHECK_URL: <DB_CONNECTION_CHECK_URL>
  DB_CONNECTION_STRING: <DB_CONNECTION_STRING>
  MM_SQLSETTINGS_DATASOURCEREPLICAS: <MM_SQLSETTINGS_DATASOURCEREPLICAS>
kind: Secret
metadata:
  name: my-postgres-connection
type: Opaque
Example for AWS Aurora with PostgreSQL:
apiVersion: v1
data:
  DB_CONNECTION_CHECK_URL: cG9zdGdyZXM6Ly91c2VyOnN1cGVyX3NlY3JldF9wYXNzd29yZEBteS1kYXRhYmFzZS5jbHVzdGVyLWFiY2QudXMtZWFzdC0xLnJkcy5hbWF6b25hd3MuY29tOjU0MzIvbWF0dGVybW9zdD9jb25uZWN0X3RpbWVvdXQ9MTAK
  DB_CONNECTION_STRING: cG9zdGdyZXM6Ly91c2VyOnN1cGVyX3NlY3JldF9wYXNzd29yZEBteS1kYXRhYmFzZS5jbHVzdGVyLWFiY2QudXMtZWFzdC0xLnJkcy5hbWF6b25hd3MuY29tOjU0MzIvbWF0dGVybW9zdD9jb25uZWN0X3RpbWVvdXQ9MTAK
  MM_SQLSETTINGS_DATASOURCEREPLICAS: cG9zdGdyZXM6Ly91c2VyOnN1cGVyX3NlY3JldF9wYXNzd29yZEBteS1kYXRhYmFzZS5jbHVzdGVyLXJvLWFiY2QudXMtZWFzdC0xLnJkcy5hbWF6b25hd3MuY29tOjU0MzIvbWF0dGVybW9zdD9jb25uZWN0X3RpbWVvdXQ9MTAK
kind: Secret
metadata:
  name: my-postgres-connection
type: Opaque
Step 4: Create the Filestore Secret
Create a file named mattermost-filestore-secret.yaml to store the credentials for your object storage service (e.g., AWS S3, MinIO). This secret must be created in the same namespace where you intend to install Mattermost. The file should contain the following YAML structure:
apiVersion: v1
kind: Secret
metadata:
  name: <secret-name>  # Choose a descriptive name (e.g., my-s3-credentials)
type: Opaque
data:
  accesskey: <base64-encoded-access-key>
  secretkey: <base64-encoded-secret-key>
Key |
Description |
Required |
|---|---|---|
accesskey |
Base64-encoded access key for your storage service. |
Yes |
secretkey |
Base64-encoded secret key for your storage service. |
Yes |
metadata.name |
The name of the Kubernetes secret. |
Yes |
Important
The accesskey and secretkey values must be base64-encoded. Do not enter the raw keys directly. Use a command-line tool or online encoder to generate the base64 strings.
Example (AWS S3):
apiVersion: v1
kind: Secret
metadata:
  name: my-s3-credentials
type: Opaque
data:
  accesskey: QUNDRVNTX0tFWQo=  # Example: Replace with your actual encoded key
  secretkey: U1VQRVJfU0VDUkVUX0tFWQo=  # Example: Replace with your actual encoded key
Step 5: Configure the Mattermost Installation Manifest
Modify the
mattermost-installation.yamlfile (created in step 2) to connect Mattermost to your external database and object storage. Refer to the supported fields for guidance on where to add these configurations within the YAML structure.Connect to the database:
Add the following to the
specsection of your manifest:spec: database: external: secret: <database-secret-name> # The name of the database secret (e.g., my-postgres-connection)
Connect to Object Storage:
Add the following to the
specsection of your manifest:spec: fileStore: external: url: <storage-service-url> # The URL of your storage service (e.g., s3.amazonaws.com) bucket: <bucket-name> # The name of your storage bucket secret: <filestore-secret-name> # The name of the filestore secret (e.g., my-s3-credentials)
If you are using Amazon S3, it’s recommended to enable server-side encryption (SSE) and SSL. Add the following environment variables to the
mattermostEnvsection:
spec:
  mattermostEnv:
    MM_FILESETTINGS_AMAZONS3SSL: true
    MM_FILESETTINGS_AMAZONS3SSE: true
Review Mattermost Resource Status
After a Mattermost installation has been created with the Operator, you can review its status with the following:
kubectl -n [namespace] get mattermost
The kubectl describe command can be used to obtain more information about the Mattermost server pods:
kubectl -n [namespace] describe pod
Follow logs
The following command can be used to follow logs on any kubernetes pod:
kubectl -n [namespace] logs -f [pod name]
If the -n [namespace] is omitted, then the default namespace of the current context is used. We recommend specifying the namespace based on your deployment.
This command can be used to review the Mattermost Operator or Mattermost server logs as needed.
Note
If you’re new to Kubernetes or prefer a managed solution, consider using a service like Amazon EKS, Azure Kubernetes Service, Google Kubernetes Engine, or DigitalOcean Kubernetes.- While this guidance focuses on using external, managed services for your database and file storage, the Mattermost Operator does offer the flexibility to use other solutions. For example, you could choose to deploy a PostgreSQL database within your Kubernetes cluster using the CloudNative PG operator (or externally however you wish), or use a self-hosted MinIO instance for object storage.
While using managed cloud services is generally simpler to maintain and our recommended approach for production deployments, using self-managed services like MinIO for storage and CloudNative PG for PostgreSQL are also valid options if you have the expertise to manage them.
If you choose to use self-managed components, you’ll need to adapt the instructions accordingly, pointing to your internal services instead.
To customize your production deployment, refer to the configuration settings documentation.
If you encounter issues during deployment, consult the deployment troubleshooting guide.
Secure your Mattermost deployment#
Deploying Mattermost in a Kubernetes environment allows you to harness Kubernetes-native features for scalability, security, and ease of management. By using an Ingress resource in combination with an ingress controller, you can enable secure HTTPS access to Mattermost while managing routing and TLS certificates effectively.
Deploy an ingress controller, such as the NGINX Ingress Controller, in your Kubernetes cluster.
Define an Ingress resource to route external traffic to your Mattermost service. Below is an example Ingress manifest:
apiVersion: networking.k8s.io/v1
kind: Ingress
metadata:
  name: mattermost-ingress
  annotations:
    nginx.ingress.kubernetes.io/ssl-redirect: "true"
    nginx.ingress.kubernetes.io/proxy-body-size: "10m"  # Customize client body size limit
    nginx.ingress.kubernetes.io/proxy-read-timeout: "60" # Customize request timeout
spec:
  tls:
  - secretName: mattermost-tls # Reference to the TLS secret
  rules:
  - host: <your-domain.com>
    http:
      paths:
      - path: /
        pathType: ImplementationSpecific
        backend:
          service:
            name: mattermost-service # Name of your Mattermost service
            port:
              number: 80
Secure HTTPS access by using TLS certificates. You can either:
Provide your own TLS certificate and private key.
Automate TLS certificate issuance and management using cert-manager. If you are providing your own TLS certificate, create a Kubernetes secret to store it.
Ensure the Ingress resource references the secret name (mattermost-tls) in its tls section.
Save your Ingress and TLS YAML manifests to files (e.g.,
ingress.yamlandtls.yaml) and apply them to your cluster using Kubernetes command-line tools.Configure DNS by ensuring your domain name
your-domain.comis properly pointed to the external IP address of your cluster or ingress controller. You can verify this using tools like nslookup or dig.After applying the Ingress, verify HTTPS Access by navigating to your domain (e.g.,
https://your-domain.com) in a web browser to verify HTTPS access. If you encounter issues, check ingress controller logs (kubectl logs -n <namespace> <ingress-controller-pod-name>, DNS records, and TLS configurations.Enable HSTS and Additional Security in your Ingress annotations.
Additionally, consider:
Enforcing a minimum TLS version (e.g., TLS 1.2).
Deploying a Web Application Firewall (WAF) for additional protection, if supported by your ingress controller.
Limiting access using Kubernetes Network Policies.
By following these steps, your Mattermost deployment in Kubernetes will be securely accessible over HTTPS using TLS. With an NGINX Ingress controller managing routing and proxying, and proper security practices in place, you’ll have a robust setup ready for production use.